Follow Me On Social Media!
Indulge in the perfect balance of flavors and textures with these delectable Chocolate Granola Cups with Peanut Butter Filling. Whether you’re rushing through a busy morning or in need of a delicious pick-me-up snack, these homemade treats are sure to hit the spot. The crunchy chocolate-coated granola shell paired with the creamy peanut butter center is a delightful combination that will keep you satisfied and energized throughout the day.
I stumbled upon this recipe during a hectic week when I needed a quick breakfast solution, and it has since become a favorite among my friends and family. From morning meetups to after-school snacks, these chocolate granola cups never fail to impress. Picture yourself taking a bite and experiencing the blissful moment when the luscious peanut butter filling oozes out, creating a truly satisfying treat.
Ditch the expensive store-bought snacks and opt for these homemade chocolate granola cups that are not only budget-friendly but also customizable to suit your preferences. Whether you enjoy them as part of a brunch spread, a dessert drizzled with extra chocolate, or a midday snack with your favorite hot beverage, these cups are versatile and always a hit. Whip up a batch, freeze some for later, and enjoy the convenience and deliciousness of these Chocolate Granola Cups with Peanut Butter Filling.
Quick Benefits
- Perfect balance of textures and flavors – crunchy chocolate-coated granola with creamy peanut butter center
- Provides lasting energy for busy mornings or afternoon snacks
- Cost-effective alternative to store-bought treats
- Portable and convenient for meal preps, hiking trips, or on-the-go snacks
Why You’ll Love This Peanut Butter Chocolate Granola Cups: Irresistible Snack Recipe Recipe
- Perfect Breakfast On-The-Go: Ideal for busy mornings, these chocolate granola cups are a convenient grab-and-go option that will keep you satisfied until lunchtime.
- Irresistible Texture and Flavor: The combination of crunchy chocolate-coated granola and creamy peanut butter filling creates a perfect balance of textures and flavors that feels like a treat.
- Energy Boosting: Provides lasting energy, making it an excellent choice for breakfast or as a midday snack when you need an energy boost.
- Crowd Pleaser: Loved by friends and family, these granola cups are sure to impress guests and loved ones, with many asking for the recipe after just one bite.
- Cost-Effective and Customizable: Save money by making these at home instead of buying expensive treats at coffee shops. Plus, you can customize the filling with almond butter, cookie butter, or even add mini chocolate chips for extra flavor.
- Meal Prep Friendly: Great for meal prepping, hiking trips, or as snacks for kids and their friends, these granola cups are versatile and easy to make in batches.
- Long Shelf Life: Stores well in the refrigerator for up to a week or in the freezer for up to 3 months, making them perfect for emergency snacks or planned meals.
- Variety of Serving Options: Serve these cups as part of a brunch spread, as an elevated dessert drizzled with melted chocolate, or as a perfect afternoon snack with coffee or tea.
- Quick and Easy Recipe: Whip up these chocolate granola cups in about 15 minutes with ingredients you likely already have on hand for a special treat without much effort.
Ingredients for Peanut Butter Chocolate Granola Cups: Irresistible Snack Recipe
For the Granola Cups
- 2 teaspoons coconut oil
- 2 1/2 cups honey granola
- 1/2 cup chopped peanuts
- 2 tablespoons peanut butter
- 3.5 oz dark chocolate, finely chopped
- 3 tablespoons honey
For the Filling
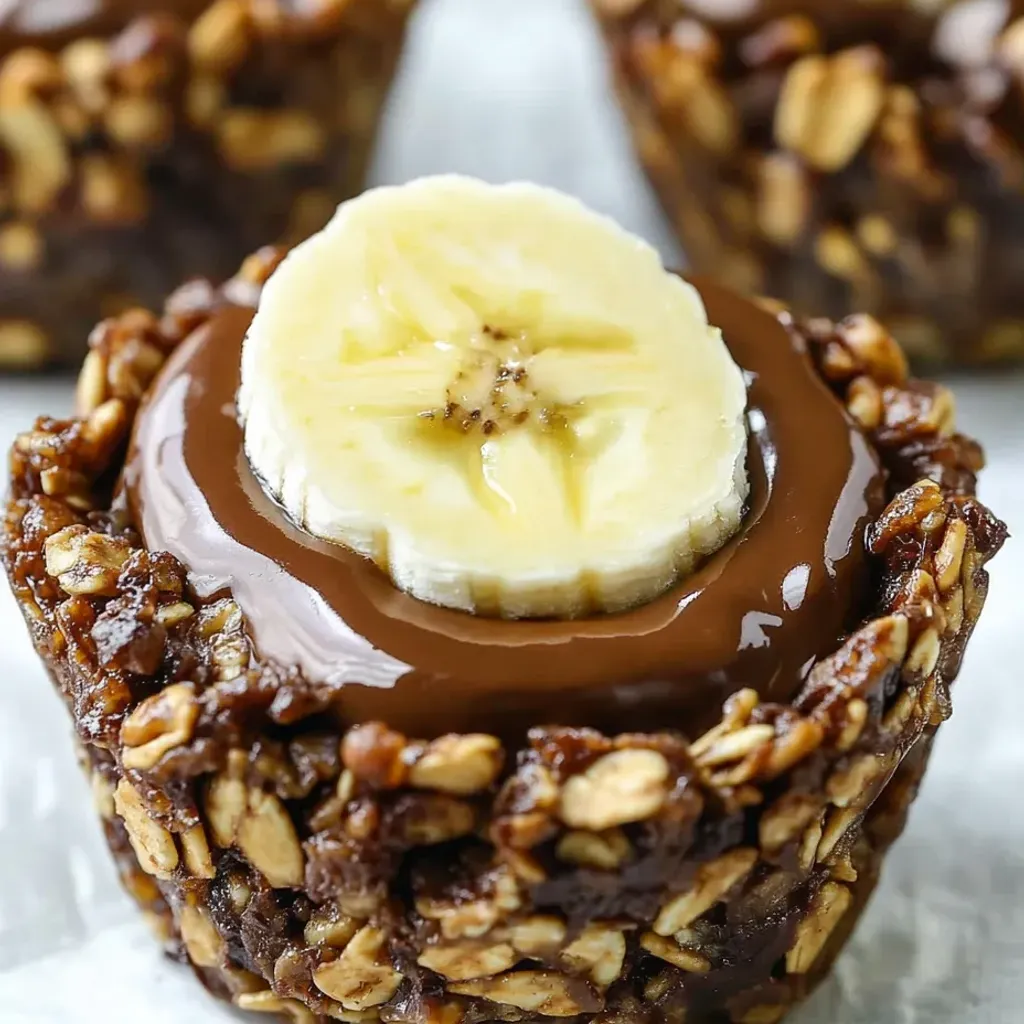
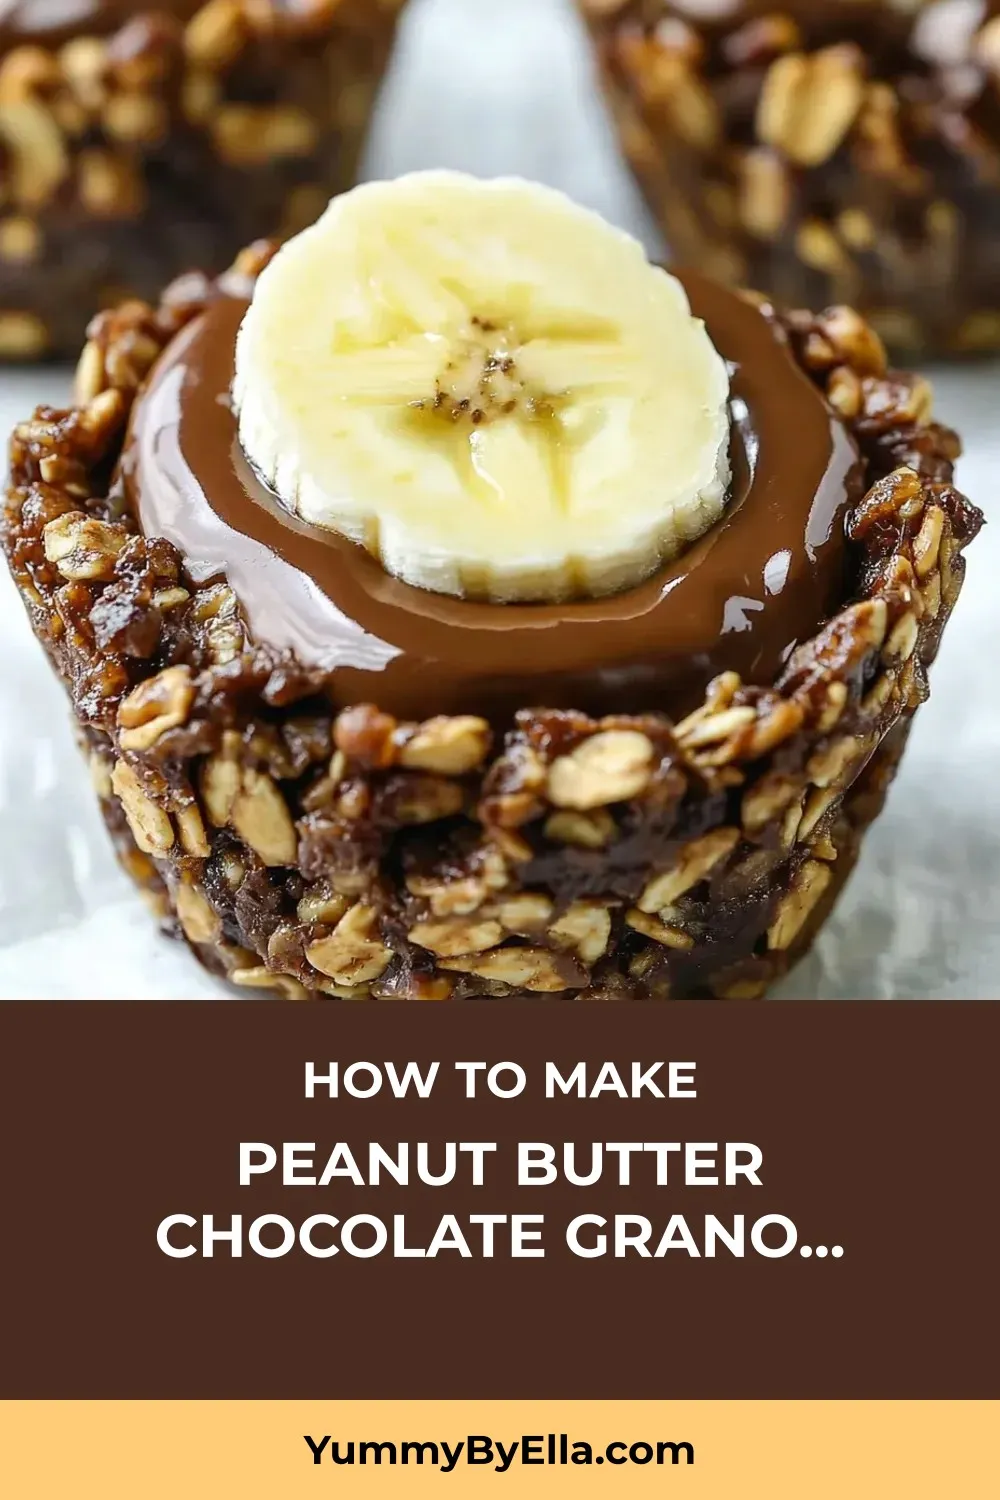
- 1 cup peanut butter
- 12 slices of banana (optional)
How to Make Peanut Butter Chocolate Granola Cups: Irresistible Snack Recipe
Step 1: Prepare the Granola
Use a rolling pin to crush any large clusters in the granola. Combine the crushed granola with chopped peanuts in a large bowl, mixing thoroughly.
Step 2: Make Chocolate Mixture
Combine chopped dark chocolate and coconut oil in a saucepan and melt. Stir in peanut butter and honey until smooth.
Step 3: Combine Chocolate and Granola
Pour the chocolate mixture over the granola and mix well until evenly coated. Allow the mixture to cool slightly if too runny. Adjust consistency by adding more granola or honey as needed. The mixture should hold together when squeezed.
Step 4: Form the Cups
Grease a 12-count cupcake pan. Divide granola mixture into cups, press firmly to compact. Create a dent in the center of each cup using your thumb or the back of a spoon.
Step 5: Set the Cups
Place the cups in the freezer for 5-10 minutes until firm but be cautious not to freeze them for too long to prevent difficulty in removing them.
Step 6: Remove from Pan
When firm, remove the cups from the pan. If they are stuck, allow them to sit at room temperature briefly or use a thin knife to loosen them from the edges.
Step 7: Fill and Garnish
Fill each cup with peanut butter, melting it beforehand if needed, and top with a banana slice if desired.
📌 Pin for later!
Step 8: Store
Store in an airtight container in the refrigerator for up to one week, or freeze for up to 3 months.
Storage Tips
Once you have made the Chocolate Granola Cups with Peanut Butter Filling, you can store them in the refrigerator for up to a week. Place the cups in an airtight container to maintain freshness and prevent them from absorbing any odors from the fridge. This storage method ensures that you can enjoy the granola cups as a convenient and delicious breakfast or snack throughout the week.
For longer storage, you can freeze the chocolate granola cups for up to 3 months. Freezing them in an airtight container or freezer-safe bag helps retain their flavor and texture. When you’re ready to enjoy a frozen cup, allow it to thaw in the refrigerator overnight or at room temperature for about 30 minutes. This way, you can have a stash of these tasty treats on hand for quick and easy snacks whenever you need them.
Ingredient Substitutions
If you don’t have honey granola on hand, you can easily substitute it with regular oats and add a bit of honey or maple syrup for sweetness. You can also mix in some extra nuts and seeds for added crunch and flavor. For a gluten-free option, use certified gluten-free oats.
If you prefer a different nut butter, such as almond butter or cashew butter, feel free to use that instead of peanut butter for the filling. This can add a unique flavor profile to the chocolate granola cups while still maintaining that creamy center. Additionally, if you have allergies or dietary restrictions, you can try sunflower seed butter as a nut-free alternative.
For a vegan version of these chocolate granola cups, use dairy-free dark chocolate and make sure the granola you use is vegan-friendly. You can also swap the honey for maple syrup or agave syrup to keep the recipe plant-based. Experiment with different toppings like dried fruit, coconut flakes, or chia seeds for added texture and taste.
Serving Suggestions
For a fun and interactive way to serve these chocolate granola cups with peanut butter filling, set up a DIY toppings bar. Offer a variety of toppings like sliced bananas, shredded coconut, mini chocolate chips, and chopped nuts. Let your guests customize their cups with their favorite toppings for a personalized treat!
To elevate these chocolate granola cups for a dessert spread, serve them alongside a scoop of vanilla ice cream. Drizzle some warm chocolate sauce over the ice cream and the granola cups for a decadent and satisfying dessert that combines crunchy, creamy, and sweet flavors in every bite. Perfect for entertaining or simply indulging in a sweet treat at home.
FAQs for Peanut Butter Chocolate Granola Cups: Irresistible Snack Recipe
Can I substitute the honey granola with another type of granola?
Yes, you can substitute honey granola with any other type of granola you prefer. Just make sure it’s crunchy and not too sweet to maintain the balance of flavors in the recipe.
Can I use milk chocolate instead of dark chocolate for the coating?
Yes, you can use milk chocolate instead of dark chocolate if you prefer a sweeter taste. The chocolate coating can be adjusted according to your personal preference.
Can I omit the peanuts if I have a nut allergy?
Yes, you can omit the chopped peanuts if you have a nut allergy. You can replace them with other seeds or dried fruits for added texture and flavor.
Can I make these chocolate granola cups in advance for a party?
Yes, these chocolate granola cups can be made in advance for a party. They keep well in the refrigerator for up to a week or can be frozen for up to 3 months. Just thaw them in the refrigerator overnight or at room temperature before serving.
Conclusion
I hope this recipe for Chocolate Granola Cups with Peanut Butter Filling becomes a staple in your kitchen, just as it has in mine. Whether you enjoy them for breakfast, as a snack on the go, or as a delightful treat for gatherings, these cups are sure to bring a smile to your face with every creamy, crunchy bite. Don’t forget to share this recipe with friends and family – they might just become obsessed with these delectable treats, just like my hiking buddies did!
Experiment with different fillings and toppings to customize these chocolate granola cups to your liking. Whether you try almond butter, cookie butter, or even a festive touch with crushed peppermint candies, the possibilities are endless. Thank you for joining me on this flavorful journey, and remember, a batch of these delicious cups in your fridge or freezer is like having a little piece of joy ready whenever you need it. Enjoy making and savoring these Chocolate Granola Cups with Peanut Butter Filling!
📌 Pin for later!
Peanut Butter Chocolate Granola Cups: Irresistible Snack Recipe
Crunchy chocolate granola cups filled with creamy peanut butter – a satisfying and energy-boosting treat perfect for breakfast, snacks, or dessert.
Prep Time15 Minutes
Cook Time~ undefined
Total Time15 Minutes
CuisineAmerican
Skill LevelEasy
Servings12 Servings (12 cups)
Ingredients
For the Granola Cups
- 2 teaspoons coconut oil
- 2 1/2 cups honey granola
- 1/2 cup chopped peanuts
- 2 tablespoons peanut butter
- 3.5 oz dark chocolate, finely chopped
- 3 tablespoons honey
For the Filling
- 1 cup peanut butter
- 12 slices of banana (optional)
Instructions
-
Prepare the Granola: Use a rolling pin to crush any large clusters in the granola. Combine the crushed granola with chopped peanuts in a large bowl, mixing thoroughly.
-
Make Chocolate Mixture: Combine chopped dark chocolate and coconut oil in a saucepan and melt. Stir in peanut butter and honey until smooth.
-
Combine Chocolate and Granola: Pour the chocolate mixture over the granola and mix well until evenly coated. Allow the mixture to cool slightly if too runny. Adjust consistency by adding more granola or honey as needed. The mixture should hold together when squeezed.
-
Form the Cups: Grease a 12-count cupcake pan. Divide granola mixture into cups, press firmly to compact. Create a dent in the center of each cup using your thumb or the back of a spoon.
-
Set the Cups: Place the cups in the freezer for 5-10 minutes until firm but be cautious not to freeze them for too long to prevent difficulty in removing them.
-
Remove from Pan: When firm, remove the cups from the pan. If they are stuck, allow them to sit at room temperature briefly or use a thin knife to loosen them from the edges.
-
Fill and Garnish: Fill each cup with peanut butter, melting it beforehand if needed, and top with a banana slice if desired.
-
Store: Store in an airtight container in the refrigerator for up to one week, or freeze for up to 3 months.