Follow Me On Social Media!
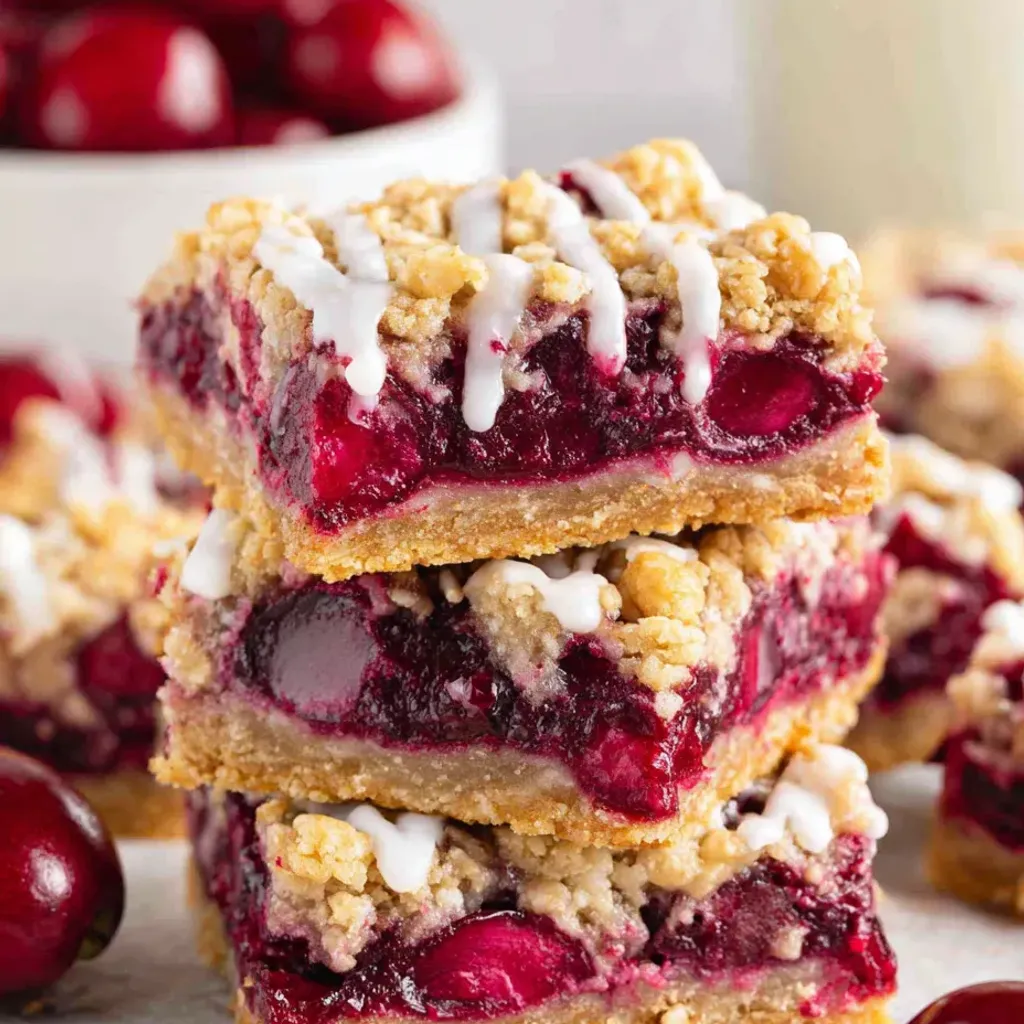
Looking for a delightful dessert that combines the goodness of cherry pie in a convenient, handheld form? Look no further than these scrumptious Cherry Pie Bars! These bars offer all the deliciousness of a homemade cherry pie without the hassle of dealing with finicky pastry. Picture a buttery oat crust providing a satisfying crunch, a luscious homemade cherry filling bursting with fruity flavors, and a sweet lemon glaze adding the perfect touch of tanginess. It’s a winning combination that will have you reaching for seconds!
I stumbled upon the idea of making these Cherry Pie Bars a few summers back when I received a generous bounty of fresh cherries from my neighbor. Since then, these bars have become a staple at gatherings and family events, outshining store-bought desserts and earning rave reviews from even the most discerning bakers. The simplicity of this recipe belies the incredible taste it delivers, making it a go-to dessert that never fails to impress. Whether you’re hosting a casual get-together or a special celebration, these Cherry Pie Bars are sure to steal the show and leave everyone asking for more!
Quick Benefits
- Easier than traditional cherry pie: Enjoy all the satisfaction of homemade cherry pie without the stress of rolling out perfect pastry or worrying about soggy bottoms and collapsing lattice tops.
- Universally appealing flavors: Butter oat crust, sweet-tart cherry filling, and bright lemon glaze make these bars a hit for all taste preferences, even those who claim not to like fruit desserts.
- Versatile for any occasion: Perfect for casual weekend barbecues or fancy dinner parties, these bars are a crowd-pleaser that work beautifully in every situation.
- Make-ahead convenience: Bake these bars in advance to allow proper cooling and setting time, enhancing the flavors and ensuring clean-cut bars for serving.
Why You’ll Love This Delicious Cherry Pie Bars Recipe Recipe
- Satisfying Homemade Cherry Pie Taste without the Hassle: Provides all the deliciousness of cherry pie without the stress of perfect pastry or worrying about soggy bottoms and collapsing lattice tops.
- Perfect for Any Gathering: Ideal for serving at backyard gatherings or events where plates and forks might be inconvenient, making them a hit at events like family reunions, barbecues, or dinner parties.
- Bright and Natural Cherry Flavor: The fresh cherry filling bursts with bright fruit flavor, making it taste much brighter and more natural than canned fillings, impressing even experienced bakers.
- Buttery Oat Crust with Crunchy Texture: The buttery oat crust offers a satisfying crunch that complements the sweet-tart cherry filling, creating a harmonious blend of flavors and textures.
- Balanced Flavors with Tangy Lemon Glaze: The sweet lemon glaze adds a delightful tang that balances the sweetness of the cherry filling, elevating the overall flavor profile of the bars.
- Easy to Make and Versatile: Easier to make than traditional cherry pie, these bars are simple to prepare and suitable for various occasions, from casual gatherings to formal events.
- Crowd-Pleasing Dessert: Appeals to a wide range of tastes, even those who claim not to enjoy fruit desserts, with the irresistible combination of buttery crust, fruity filling, and tangy glaze.
- Enhanced Flavor with Patience: Allowing the bars to cool properly enhances the flavors and textures, ensuring clean-cut bars instead of a messy pile of crumbs and allowing the flavors to meld together for an even more delicious outcome.
Ingredients for Delicious Cherry Pie Bars Recipe
Oat Crust and Topping
- ½ cup packed light brown sugar (100 grams)
- ½ teaspoon baking powder
- 1¼ cups old-fashioned rolled oats (125 grams)
- 1 large egg
- ¼ teaspoon salt
- 1½ cups all-purpose flour (180 grams)
- ¾ cup cold unsalted butter (170 grams), cubed
Cherry Filling
- 1 teaspoon vanilla extract
- 1 tablespoon lemon juice
- ¼ cup tapioca starch or cornstarch (30 grams)
- 3 cups pitted fresh sweet cherries (480 grams)
- ⅓ cup light brown sugar (65 grams)
Lemon Glaze
- ½ cup powdered sugar (60 grams)
- 1 teaspoon lemon juice
- 1 tablespoon milk or cream
How to Make Delicious Cherry Pie Bars Recipe
Step 1: Preheat oven
Preheat the oven to 350 degrees. Line a 9-inch square pan with parchment paper or lightly grease it.
Step 2: Cook the cherry filling
Combine cherries, brown sugar, lemon juice, and vanilla in a medium saucepan. Cook over medium heat for 3 to 4 minutes, stirring frequently, until cherries begin to release their juices.
Step 3: Thicken the filling
Add tapioca starch and continue cooking for 2 to 3 minutes until thickened. Remove from heat and allow to cool slightly.
Step 4: Make the crust base
Combine flour, oats, brown sugar, baking powder, and salt in a food processor. Pulse briefly to combine.
Step 5: Add butter and egg
Add cold butter cubes to the food processor and pulse until mixture resembles coarse crumbs with pea-sized pieces. Lightly beat an egg in a small bowl, then add it to the processor and pulse until the dough starts to come together and can hold its shape when pressed.
Step 6: Reserve topping
Set aside approximately 1 heaping cup of the mixture for later use as a topping for the bars.
Step 7: Press the crust
Evenly press the remaining mixture firmly into the bottom of the prepared pan.
Step 8: Add filling and topping
Evenly spread the cherry filling over the crust, then sprinkle the reserved oat mixture on top.
Step 9: Bake
Bake for 40-45 minutes until the top is lightly golden and the filling is bubbling around the edges. Cool completely in the pan on a wire rack.
Step 10: Make the glaze
In a bowl, whisk together lemon juice and powdered sugar, then gradually mix in milk until a thick yet pourable glaze forms. Add more milk in small increments if necessary. Drizzle over cooled bars.
📌 Pin for later!
Storage Tips
Once the cherry pie bars have been baked and cooled, it is important to store them properly to maintain their freshness and flavor. To store the finished dish, first, allow the bars to cool completely at room temperature. Once cooled, cover the baking pan or individual bars tightly with plastic wrap or aluminum foil to prevent them from drying out. Alternatively, you can transfer the bars to an airtight container with a lid for storage. Properly stored cherry pie bars can be kept at room temperature for up to 2 days, or in the refrigerator for up to 5 days.
For longer storage, you can freeze the cherry pie bars. Wrap the cooled bars tightly in plastic wrap and then aluminum foil to prevent freezer burn. Place the wrapped bars in a freezer-safe container or resealable plastic bag, removing as much air as possible before sealing. The bars can be frozen for up to 2-3 months. When ready to enjoy, thaw the bars overnight in the refrigerator or at room temperature before serving. Whether stored at room temperature, in the refrigerator, or in the freezer, the cherry pie bars will maintain their delicious flavor and texture when properly stored.
Ingredient Substitutions
For the crust and topping in these cherry pie bars, it’s essential to use old-fashioned rolled oats rather than quick oats or steel-cut oats. Quick oats can make the texture mushy, while steel-cut oats are too hard. If you are looking to make this recipe gluten-free, you can substitute the all-purpose flour with a one-to-one gluten-free flour blend.
If fresh sweet cherries are not available, you can use frozen cherries as a substitute. Just make sure to thaw and drain them well before using in the recipe. Additionally, if you prefer a different fruit filling, such as blueberries or raspberries, you can easily swap out the cherries for your fruit of choice while keeping the remaining ingredients and measurements the same. This allows you to customize the bars to your taste preferences or based on what fruits are in season.
Serving Suggestions
For a creative serving suggestion, try cutting these cherry pie bars into smaller bite-size pieces and serving them on a wooden board or slate platter for a rustic and inviting presentation. You can sprinkle some extra powdered sugar over the top for an elegant touch before serving. Another fun idea is to top each bar with a dollop of fresh whipped cream or a scoop of vanilla ice cream to create a delightful cherry pie bar sundae that will impress your guests and elevate the dessert experience.
To take these cherry pie bars to the next level, consider drizzling some melted dark or white chocolate over the top in a decorative pattern before cutting them into squares. The added richness and indulgence of the chocolate will complement the sweet-tart cherry filling and buttery oat crust, creating a decadent dessert that is sure to be a hit at any gathering. You can also garnish each bar with a fresh cherry on top for a pop of color and freshness that will make these bars look even more irresistible on the dessert table.
FAQs for Delicious Cherry Pie Bars Recipe
Why is it important to use old-fashioned rolled oats for this recipe?
Old-fashioned rolled oats are ideal for this recipe because they provide the perfect texture to the crust and topping. Quick oats would absorb too much moisture and result in a mushy texture, while steel-cut oats are too hard for this application.
Can I use frozen cherries instead of fresh cherries?
Yes, you can substitute frozen cherries for fresh cherries in this recipe. Just make sure to thaw and drain them well before using, and adjust the sugar levels in the filling if needed based on the sweetness of the cherries.
How do I store leftover cherry pie bars?
To store leftover cherry pie bars, place them in an airtight container and refrigerate for up to 3-4 days. You can also freeze the bars for longer storage; just make sure to wrap them tightly in plastic wrap and aluminum foil before freezing.
Can I make these cherry pie bars in advance?
Yes, these cherry pie bars are a great make-ahead dessert. You can bake them the day before serving to allow the flavors to meld together and the bars to set up properly. They actually taste even better the next day!
Conclusion
I hope this recipe for Cherry Pie Bars brings as much joy and delight to your gatherings as it has to mine. The simplicity of this recipe, paired with the vibrant flavors of fresh cherries and that zesty lemon glaze, always seems to impress even the most discerning of dessert lovers. Whether you’re hosting a family reunion, a casual barbecue, or a special dinner party, these bars are sure to be a hit.
Remember, the key to perfect Cherry Pie Bars lies in allowing them to cool completely before cutting into them. This simple act of patience ensures that each bar holds together beautifully, showcasing the layers of buttery oat crust and luscious cherry filling. So, bake a batch of these bars, share them with your loved ones, and bask in the praise that is sure to follow. Here’s to many more gatherings filled with the delicious aroma and taste of Cherry Pie Bars!
📌 Pin for later!
Delicious Cherry Pie Bars Recipe
Indulge in the perfect balance of buttery oat crust, sweet-tart cherry filling, and tangy lemon glaze with these crowd-pleasing Cherry Pie Bars.
Prep Time20 Minutes
Cook Time40 Minutes
Total Time60 Minutes
CuisineAmerican
Skill LevelEasy
Servings12 Servings (12 bars)
Ingredients
Oat Crust and Topping
- ½ cup packed light brown sugar (100 grams)
- ½ teaspoon baking powder
- 1¼ cups old-fashioned rolled oats (125 grams)
- 1 large egg
- ¼ teaspoon salt
- 1½ cups all-purpose flour (180 grams)
- ¾ cup cold unsalted butter (170 grams), cubed
Cherry Filling
- 1 teaspoon vanilla extract
- 1 tablespoon lemon juice
- ¼ cup tapioca starch or cornstarch (30 grams)
- 3 cups pitted fresh sweet cherries (480 grams)
- ⅓ cup light brown sugar (65 grams)
Lemon Glaze
- ½ cup powdered sugar (60 grams)
- 1 teaspoon lemon juice
- 1 tablespoon milk or cream
Instructions
-
Preheat oven: Preheat the oven to 350 degrees. Line a 9-inch square pan with parchment paper or lightly grease it.
-
Cook the cherry filling: Combine cherries, brown sugar, lemon juice, and vanilla in a medium saucepan. Cook over medium heat for 3 to 4 minutes, stirring frequently, until cherries begin to release their juices.
-
Thicken the filling: Add tapioca starch and continue cooking for 2 to 3 minutes until thickened. Remove from heat and allow to cool slightly.
-
Make the crust base: Combine flour, oats, brown sugar, baking powder, and salt in a food processor. Pulse briefly to combine.
-
Add butter and egg: Add cold butter cubes to the food processor and pulse until mixture resembles coarse crumbs with pea-sized pieces. Lightly beat an egg in a small bowl, then add it to the processor and pulse until the dough starts to come together and can hold its shape when pressed.
-
Reserve topping: Set aside approximately 1 heaping cup of the mixture for later use as a topping for the bars.
-
Press the crust: Evenly press the remaining mixture firmly into the bottom of the prepared pan.
-
Add filling and topping: Evenly spread the cherry filling over the crust, then sprinkle the reserved oat mixture on top.
-
Bake: Bake for 40-45 minutes until the top is lightly golden and the filling is bubbling around the edges. Cool completely in the pan on a wire rack.
-
Make the glaze: In a bowl, whisk together lemon juice and powdered sugar, then gradually mix in milk until a thick yet pourable glaze forms. Add more milk in small increments if necessary. Drizzle over cooled bars.