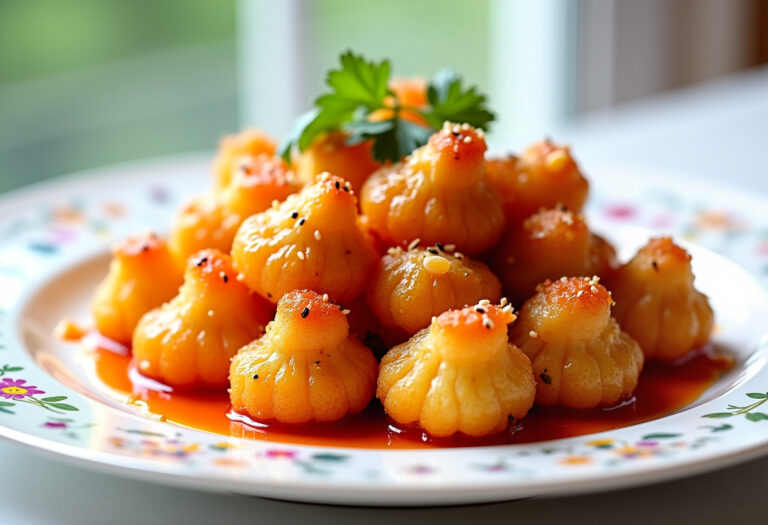
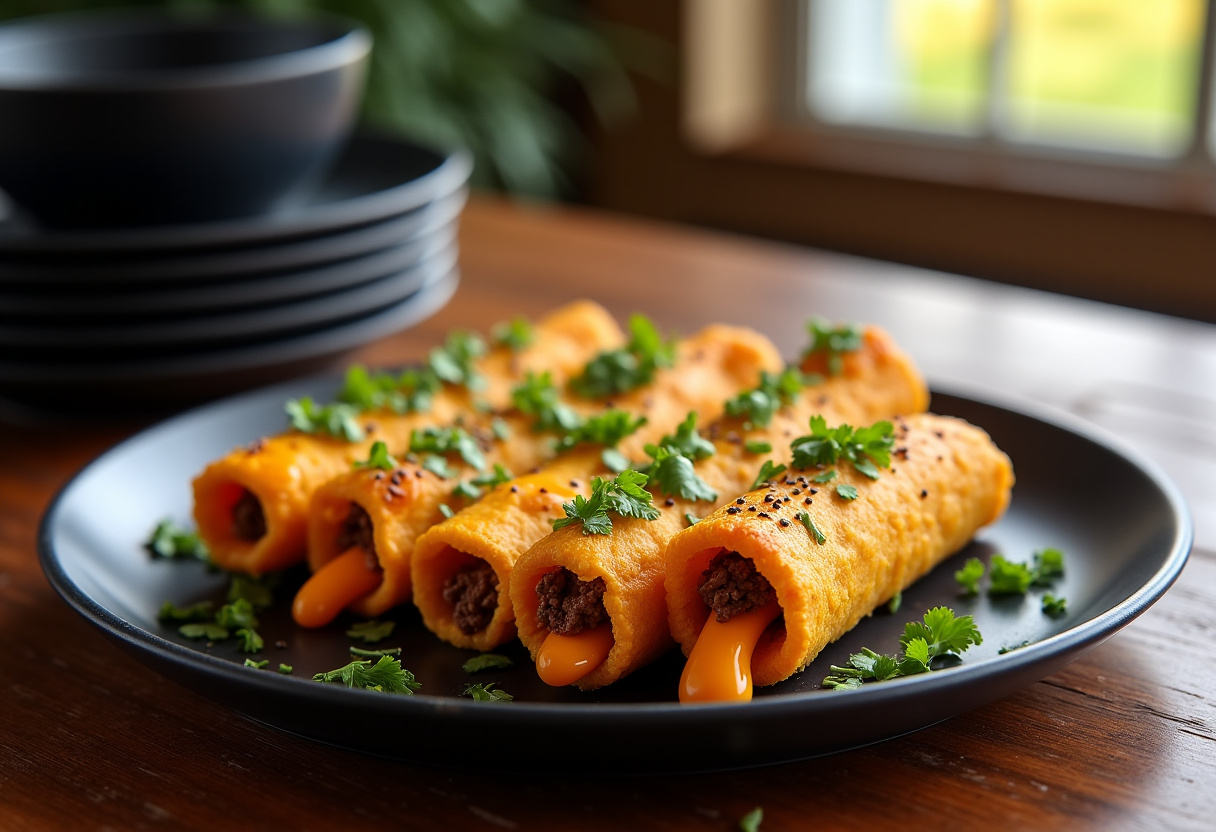
Cheesy Taco Sticks
Introduction
When you’re craving a savory and satisfying snack that’s perfect for any occasion, Cheesy Taco Sticks are the answer. These delightful treats feature a golden crust, gooey melted cheese, and seasoned beef, creating a Tex-Mex delight that’s sure to please your taste buds. Whether you’re hosting a game night, planning a casual dinner, or simply looking for a delicious snack, these Cheesy Taco Sticks are a crowd-pleaser that disappears in no time.
Why Choose This Cheesy Taco Sticks Recipe?
If you’re wondering why you should opt for this Cheesy Taco Sticks recipe, here are some compelling reasons:
- Easy to assemble and perfect for a quick snack or meal.
- Delicious taste with a crispy exterior and a cheesy, saucy interior.
- Highly customizable with your favorite taco toppings or proteins.
- Freezes well, making it a convenient make-ahead option.
- Appeals to both kids and adults and is ideal for various occasions.
Ingredients for Cheesy Taco Sticks
Prep Time: 15 minutes | Cook Time: 15 minutes
Perfect Cheesy Taco Sticks – follow our detailed recipe below!
- 1/4 cup water
- 1 to 1 1/2 cups shredded cheddar cheese
- 1 pound ground beef
Step-by-Step Instructions for Cheesy Taco Sticks
Step 1: Preheating
Preheat the oven to 375°F (190°C) and line a baking sheet with parchment paper.
Step 2: Cooking Ground Beef
In a skillet over medium heat, cook the ground beef until browned. Drain any excess fat.
Step 3: Adding Seasoning
Add taco seasoning and water to the cooked ground beef. Simmer for 3–4 minutes until the mixture thickens. Remove from heat and allow it to cool slightly.
Step 4: Dough Preparation
Roll out the dough on a lightly floured surface and cut it into 3×5 inch rectangles.
Step 5: Filling Assembly
Spoon a layer of the taco meat in the center of each dough piece and top it with shredded cheddar cheese.
Step 6: Folding and Sealing
Fold over the dough to enclose the filling and seal the edges tightly. Place the taco sticks seam-side down on the prepared baking sheet.
Step 7: Final Touch
Brush the taco sticks with melted butter, sprinkle with garlic powder, and add extra cheese and cilantro if desired.
Step 8: Baking
Bake the Cheesy Taco Sticks for 15–18 minutes or until they are golden brown. Allow them to cool slightly before serving.
Stay tuned for the continuation of this Cheesy Taco Sticks recipe to discover the final steps, serving suggestions, and more helpful tips for creating this delicious snack!
Nutritional Benefits of Cheesy Taco Sticks
Cheesy Taco Sticks are not only a delicious treat but also offer some nutritional value. The ground beef used in the filling provides protein, iron, and zinc. The cheddar cheese used adds calcium and protein. The dough provides carbohydrates for energy. Additionally, you can sneak in some veggies like bell peppers or onions to increase the fiber content and vitamin intake.
By using lean ground beef and opting for whole wheat dough, you can make these taco sticks a healthier option. They are a balanced snack that can be enjoyed in moderation as part of a well-rounded diet.
Origin and History of Cheesy Taco Sticks
Cheesy Taco Sticks are a fusion of Tex-Mex flavors wrapped in a convenient handheld form. While the exact origin of this dish is unclear, it draws inspiration from traditional Mexican tacos and American comfort food. The combination of seasoned ground beef, gooey cheese, and warm dough reflects the culinary diversity found in many households.
These taco sticks have gained popularity for their versatility and ease of preparation. They are perfect for busy weeknights, game day gatherings, or as a fun twist on classic taco night. Over time, they have become a favorite snack or appetizer choice for those craving a savory and cheesy treat.
Delicious Variations of Cheesy Taco Sticks
If you’re looking to switch up the traditional Cheesy Taco Sticks recipe, here are some creative variations to try:
- Vegetarian Option: Replace the ground beef with plant-based crumbles or black beans for a meatless version.
- Gluten-Free Twist: Use gluten-free pizza dough or a homemade gluten-free dough recipe for those with dietary restrictions.
- Spicy Kick: Add diced jalapeños or a sprinkle of red pepper flakes for some heat.
- Cheese Lover’s Dream: Experiment with different cheese blends such as pepper jack, mozzarella, or a Mexican cheese mix for varied flavors.
- Fresh Herb Infusion: Mix chopped fresh cilantro or parsley into the filling for a burst of freshness.
These variations allow you to tailor the dish to suit your preferences or dietary needs while keeping the essence of cheesy taco goodness intact.
Pro Chef Tips for Perfect Cheesy Taco Sticks
To ensure your Cheesy Taco Sticks turn out perfectly every time, consider these expert tips:
- Thoroughly seal the edges of the dough to prevent any filling from leaking out during baking.
- Allow the cooked filling to cool slightly before assembling the taco sticks to prevent the dough from becoming soggy.
- Brushing the tops of the taco sticks with melted butter before baking adds a golden finish and richness to the dough.
- Experiment with different seasonings in the filling to customize the flavor profile to your liking.
- Serve the taco sticks with a variety of dipping sauces like salsa, sour cream, or guacamole for added flavor and enjoyment.
By following these tips, you can elevate your Cheesy Taco Sticks game and impress your family and friends with a delicious and satisfying snack or meal option.
Common Mistakes to Avoid When Making Cheesy Taco Sticks
Here are some common mistakes that beginners might make when preparing Cheesy Taco Sticks and how to avoid them:
- Overfilling the Dough: Be cautious not to overstuff the dough with filling as it can lead to leaks during baking. Use a moderate amount of filling to ensure the taco sticks seal properly.
- Not Sealing the Edges: Make sure to seal the edges of the dough tightly to prevent the filling from spilling out while baking. Press the edges firmly together or use a fork to crimp and seal.
- Using Cold Dough: Allow refrigerated dough to come to room temperature before rolling it out. Cold dough may crack or tear while shaping, affecting the final texture of the taco sticks.
- Skipping the Seasoning: Ensure the taco meat is well-seasoned to infuse flavor into the dish. Taste and adjust the seasoning to suit your preference before assembling the taco sticks.
- Overbaking: Watch the baking time closely to avoid overbrowning or drying out the taco sticks. Remove them from the oven when they are golden and the cheese is melted and bubbly.
Ingredient Substitutions for Cheesy Taco Sticks
For those with dietary restrictions or preferences, here are some ingredient substitutions you can make for Cheesy Taco Sticks:
- Dairy-Free: Substitute dairy-free cheese for cheddar cheese or omit the cheese altogether for a dairy-free version.
- Gluten-Free: Use gluten-free pizza dough or crescent roll dough to make the taco sticks suitable for those avoiding gluten.
- Vegetarian: Replace the ground beef with plant-based crumbles or a mix of black beans and corn for a vegetarian option.
- Spicy Variation: Add diced jalapeños or a sprinkle of cayenne pepper to the taco meat for a spicier version of the taco sticks.
Storage and Reheating Tips for Cheesy Taco Sticks
To store leftover Cheesy Taco Sticks, place them in an airtight container or wrap them tightly in foil. They can be refrigerated for up to 3-4 days. When reheating, use an oven or toaster oven set at 350°F (175°C) for about 10-15 minutes until heated through. This method helps maintain the crispy texture of the exterior while ensuring the cheese inside melts perfectly.
Perfect Side Dishes for Cheesy Taco Sticks
Pair your Cheesy Taco Sticks with these delicious side dishes and beverages to create a complete meal:
- Side Salad: Serve with a crisp green salad topped with avocado, cherry tomatoes, and a zesty dressing for a refreshing contrast.
- Mexican Street Corn: Enjoy elote-style corn on the cob with a sprinkle of cotija cheese, chili powder, and a squeeze of lime for a flavorful side.
- Fruit Salsa: Prepare a colorful fruit salsa with mango, pineapple, red onion, cilantro, and lime juice to add a sweet and tangy element to the meal.
- Margarita: Cool down with a classic margarita or a refreshing glass of aguas frescas like watermelon or cucumber for a festive beverage pairing.
Frequently Asked Questions About Cheesy Taco Sticks
How long does Cheesy Taco Sticks keep in the refrigerator?
Cheesy Taco Sticks can be stored in an airtight container in the refrigerator for up to 3-4 days. To ensure freshness, look out for any signs of spoilage such as an off smell, mold growth, or changes in texture.
Can I prepare Cheesy Taco Sticks ahead of time?
You can prepare Cheesy Taco Sticks ahead of time by assembling them up to the point of baking and refrigerating them. When ready to eat, simply bake them according to the recipe instructions. This allows for easy make-ahead options, especially for parties or gatherings. Ensure you tightly cover the sticks to prevent drying out.
What are the best ingredient substitutions for Cheesy Taco Sticks?
For Cheesy Taco Sticks, you can make ingredient substitutions to suit your preferences. Ground beef can be swapped with ground turkey, chicken, or plant-based crumbles. Cheddar cheese can be substituted with mozzarella, pepper jack, or a Mexican cheese blend. Additionally, you can customize the filling with various add-ins like sautéed onions, jalapeños, or black beans for added flavor and texture.
How can I make Cheesy Taco Sticks healthier?
To make Cheesy Taco Sticks healthier, consider using lean ground meat options such as turkey or chicken, and opt for reduced-fat cheese. You can also add more veggies like bell peppers, tomatoes, or spinach to increase the nutritional value. Using whole wheat or multigrain dough can also boost the fiber content of the dish.
Is Cheesy Taco Sticks suitable for meal prep?
Cheesy Taco Sticks are great for meal prep as they can be portioned out and stored in meal prep containers. When reheating, microwave the sticks until warmed through or use an oven to maintain their crispiness. Portion control ensures you have a convenient grab-and-go option for lunches or snacks.
Final Thoughts on This Cheesy Taco Sticks Recipe
These Cheesy Taco Sticks are a delightful combination of crispy, cheesy, and savory flavors that make them a perfect snack or meal option for any occasion. Their versatility allows you to customize the ingredients to suit your taste preferences. Whether you’re hosting a party, looking for a quick dinner idea, or simply craving a tasty snack, these taco sticks are sure to satisfy. Try this recipe today and share your delicious creations with us! Don’t forget to spice up your meal with your favorite dipping sauces. Get ready to impress your guests or treat yourself to a delicious homemade snack. Enjoy!
📌 Save This Recipe & Explore Even More Delicious Inspiration!
Loved this dish? Don’t lose track of it — pin it now on Pinterest so it’s always within reach. Sharing your favorite pins also helps others discover easy, flavorful meals!
💡 Whether you’re prepping for the week or cooking something special for friends and family, keeping your favorite recipes saved makes cooking a breeze. Pinterest is a great tool for building your personal cookbook, finding fresh twists on classic meals, and keeping all your go-tos in one place.
📲 Be sure to follow us on Pinterest for daily meal inspiration — from comforting dinners and quick lunches to seasonal treats and wholesome snacks. We’re always adding new ideas that suit your lifestyle and cravings.
📖 Hungry for more? Visit our recipe collection to discover a world of simple, satisfying dishes. No matter your experience in the kitchen, you’ll find recipes that are easy to follow and full of flavor.
✨ Don’t forget to check back regularly — we’re always serving up something new and tasty!