Follow Me On Social Media!
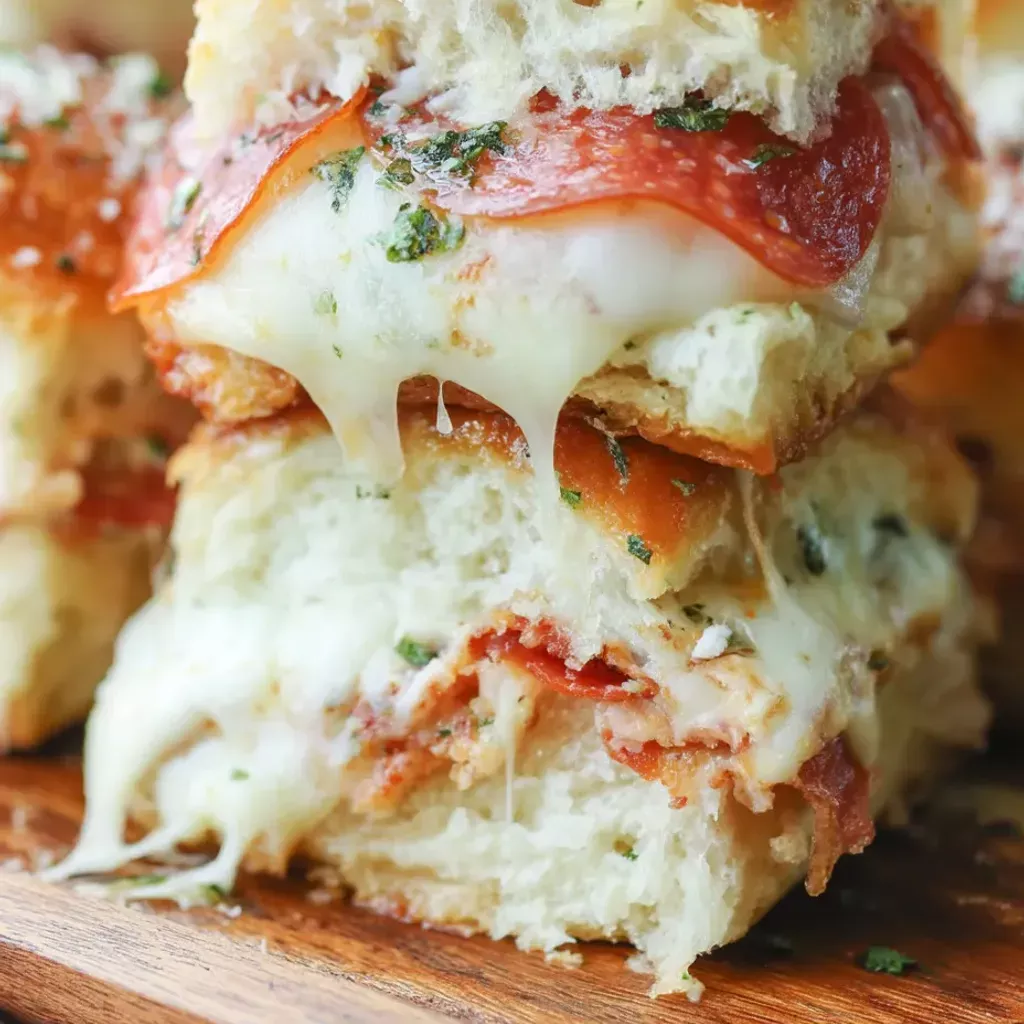
Looking for a crowd-pleasing snack that’s easy to make and impossible to resist? Look no further than these Pepperoni Pizza Sliders! These sliders are the perfect solution for game days, kids’ sleepovers, or any occasion where you need delicious food without the hassle. The combination of sweet Hawaiian rolls, tangy pizza sauce, gooey melted cheese, and crispy pepperoni is sure to be a hit with everyone at the table.
I stumbled upon this recipe during a football season when I needed a quick and tasty snack beyond the usual fare. Little did I know that these sliders would become a staple in our household, loved by even the pickiest eaters. The Hawaiian rolls provide a soft and slightly sweet base, while the mini pepperoni ensures that every bite is packed with flavor. Topped with a herb-loaded butter mixture, these sliders are not just good – they’re “fire,” as my teenage nephew eloquently put it. So, grab a tray of these Pepperoni Pizza Sliders and watch them disappear in no time!
Quick Benefits
- Convenience: Easy to make for quick meal preps, game day snacks, or casual gatherings without spending hours in the kitchen.
- Versatility: Adaptable for various dietary preferences with topping variations like supreme pizza, BBQ chicken, vegetarian, or breakfast options.
- Flavorful: Perfect blend of sweet Hawaiian rolls, tangy pizza sauce, crispy pepperoni, and melty cheese with a herb butter topping that enhances every bite.
- Make-ahead: Prep up to 24 hours in advance, refrigerate, and bake when ready; components can be prepared separately for quick assembly and reheating maintains quality for next day enjoyment.
Why You’ll Love This Cheesy Pepperoni Pizza Sliders: Easy Recipe Recipe
- Quick and Easy: Perfect for busy days or last-minute gatherings, these sliders are simple to assemble and require minimal effort.
- Crowd-Pleasing: Ideal for game days, kids’ sleepovers, or any event where you need to feed a group, these sliders are sure to be a hit with both kids and adults.
- Irresistible Flavors: The combination of sweet Hawaiian rolls, tangy pizza sauce, gooey cheese, and crispy pepperoni creates a delicious medley of flavors and textures.
- Teen-Approved: Even picky eaters like teenagers will love these sliders – they’re so delicious that even a 16-year-old will ask for seconds and leftovers.
- Versatile: Customizable with different toppings like veggies, BBQ chicken, or even a breakfast version, these sliders can be adapted to suit various preferences.
- Make-Ahead Friendly: With make-ahead strategies and easy reheating techniques, you can prepare these sliders in advance for a stress-free meal or snack option.
- Perfect for Entertaining: Whether served as an appetizer, main course, or part of a game day spread, these sliders are a versatile and satisfying addition to any gathering.
Ingredients for Cheesy Pepperoni Pizza Sliders: Easy Recipe
For the Sliders
- 2 cups mozzarella cheese, shredded
- 2.5 ounces mini pepperoni
- 1 package (12-count) Hawaiian dinner rolls
- ½ cup pizza sauce (homemade or store-bought)
For the Garlic Herb Butter Topping
- ¼ teaspoon salt
- 2 tablespoons Parmesan cheese, freshly grated
- 1 teaspoon Italian seasoning
- ¼ cup butter, melted
- 2 tablespoons fresh parsley, minced
- ¼ teaspoon red pepper flakes
- 1 teaspoon garlic powder
How to Make Cheesy Pepperoni Pizza Sliders: Easy Recipe
Step 1: Preheat oven and prepare baking dish
Preheat oven to 400°F (200°C) and grease a 9×13-inch baking dish with nonstick cooking spray or line it with parchment paper.
Step 2: Slice the rolls
Carefully slice the entire package of Hawaiian dinner rolls horizontally with a sharp serrated knife to create one slab of tops and one slab of bottoms. Place the bottom half of the rolls in the prepared baking dish with the cut side facing up.
Step 3: Add sauce and first layer of cheese
Spread pizza sauce evenly over bottom half of rolls, covering edges. Sprinkle half of the shredded mozzarella cheese (1 cup) evenly on top of sauce.
Step 4: Add pepperoni and remaining cheese
Layer mini pepperoni evenly over the first layer of cheese, slightly overlapping them. Sprinkle remaining 1 cup of mozzarella cheese on top to bind ingredients together.
Step 5: Complete assembly
Place the top half of the rolls over the filling, aligning it with the bottom half to ensure the individual rolls are properly lined up.
Step 6: Prepare herb butter topping
Combine melted butter, grated Parmesan cheese, minced parsley, garlic powder, Italian seasoning, salt, and red pepper flakes in a small bowl. Mix until well combined.
Step 7: Add topping to sliders
Spread the herb butter mixture evenly over the tops of the rolls using a pastry brush or spoon, ensuring the entire surface is covered. Allow some of the mixture to drip down the sides for added flavor and to crisp the edges.
Step 8: Bake covered
Loosely cover the baking dish with aluminum foil, making a tent shape to avoid touching the rolls. Bake in the preheated oven for 20 minutes to prevent the tops from burning and ensure the filling is heated through and the cheese melts.
Step 9: Bake uncovered
Uncover and bake for 5-7 minutes more until the tops of the rolls are golden brown and crispy, and the cheese is melted and bubbly.
Step 10: Rest and serve
Take the sliders out of the oven and allow them to rest for 3-5 minutes. This helps the cheese to set, making cutting and serving easier. Use a sharp knife to separate the sliders by cutting along the seams of the rolls. Serve warm.
Storage Tips
Once you have prepared the pepperoni pizza sliders, you can store any leftovers in an airtight container in the refrigerator for up to 3 days. To maintain their freshness and quality when reheating, it is recommended to wrap the leftover sliders in foil and warm them in a 350°F oven for about 10 minutes. This method helps prevent the sliders from becoming soggy, unlike reheating in the microwave. By following this reheating technique, you can enjoy the sliders as a quick and delicious next-day lunch without compromising their taste and texture.
For make-ahead strategies, you can prepare the sliders up to 24 hours in advance. After assembling the sliders, cover them and store them in the refrigerator. When you are ready to bake them, simply add an extra 5-10 minutes to the baking time to ensure they are heated through. Additionally, you can save time by prepping the herb butter topping ahead of time and storing it in the refrigerator. Before using, warm the butter slightly to make it easier to spread on top of the sliders. These storage and make-ahead tips help streamline your cooking process and allow you to enjoy these crowd-pleasing pepperoni pizza sliders with minimal effort whenever you need a delicious snack or meal.
Ingredient Substitutions
If you don’t have mini pepperoni on hand, regular sized pepperoni slices can be used instead. Simply chop them into smaller pieces to ensure they distribute evenly throughout the sliders and provide that classic pepperoni flavor in each bite.
For a vegetarian version of these sliders, you can substitute the mini pepperoni with thinly sliced vegetables like mushrooms, bell peppers, and onions. Sauté the vegetables before adding them to the sliders to ensure they are cooked through and add a delicious savory element that complements the cheese and sauce.
If you prefer a different type of cheese, feel free to experiment with your favorite varieties. Cheddar, provolone, or a blend of different cheeses can be used instead of mozzarella to add a unique twist to the sliders while still achieving that gooey, cheesy texture that everyone loves. Just make sure to choose a cheese that melts well for the best results.
Serving Suggestions
Serve these Pepperoni Pizza Sliders with a side of marinara dipping sauce for an extra burst of pizza flavor. The tangy sauce complements the cheesy sliders perfectly and adds a fun interactive element to the meal. For a fun twist, consider adding a sprinkle of extra Parmesan cheese and fresh basil on top of the sliders before serving to enhance the Italian flavors and add a pop of color.
To elevate these sliders for a party or gathering, arrange them on a large platter garnished with fresh parsley and red pepper flakes for a vibrant presentation. The colorful toppings will not only make the sliders visually appealing but will also entice guests to dig into these delicious bite-sized treats. Pair them with a refreshing pitcher of lemonade or a selection of craft beers to create a casual yet inviting spread that will have everyone coming back for more.
FAQs for Cheesy Pepperoni Pizza Sliders: Easy Recipe
Question?
What are some variations I can try for these Pepperoni Pizza Sliders?
Question?
Can I make these Pepperoni Pizza Sliders ahead of time?
Question?
How should I store and reheat leftover Pepperoni Pizza Sliders?
Conclusion
In conclusion, these Pepperoni Pizza Sliders are a true crowd-pleaser that never fails to impress. The perfect combination of sweet Hawaiian rolls, tangy pizza sauce, crispy pepperoni, and gooey cheese creates a symphony of flavors that will have everyone reaching for seconds. Whether you’re hosting a game day gathering, a kids’ sleepover, or simply looking for a delicious and easy-to-make meal, these sliders are sure to be a hit.
Don’t be afraid to get creative with toppings and variations to suit your taste preferences. From a loaded Supreme Pizza edition to a breakfast-inspired twist, the possibilities are endless. With make-ahead strategies and storage tips, you can easily prepare these sliders in advance and enjoy them whenever hunger strikes. So, whip up a batch of these Pepperoni Pizza Sliders, gather your loved ones, and savor every bite of these delightful handheld treats.
Cheesy Pepperoni Pizza Sliders: Easy Recipe
Easy Pepperoni Pizza Sliders on sweet Hawaiian rolls with melty cheese and zesty herb butter – a game day favorite that disappears in seconds!
Prep Time15 Minutes
Cook Time25 Minutes
Total Time40 Minutes
CuisineAmerican-Italian Fusion
Skill LevelEasy
Servings6 Servings (12 sliders)
Ingredients
For the Sliders
- 2 cups mozzarella cheese, shredded
- 2.5 ounces mini pepperoni
- 1 package (12-count) Hawaiian dinner rolls
- ½ cup pizza sauce (homemade or store-bought)
For the Garlic Herb Butter Topping
- ¼ teaspoon salt
- 2 tablespoons Parmesan cheese, freshly grated
- 1 teaspoon Italian seasoning
- ¼ cup butter, melted
- 2 tablespoons fresh parsley, minced
- ¼ teaspoon red pepper flakes
- 1 teaspoon garlic powder
Instructions
-
Preheat oven and prepare baking dish: Preheat oven to 400°F (200°C) and grease a 9×13-inch baking dish with nonstick cooking spray or line it with parchment paper.
-
Slice the rolls: Carefully slice the entire package of Hawaiian dinner rolls horizontally with a sharp serrated knife to create one slab of tops and one slab of bottoms. Place the bottom half of the rolls in the prepared baking dish with the cut side facing up.
-
Add sauce and first layer of cheese: Spread pizza sauce evenly over bottom half of rolls, covering edges. Sprinkle half of the shredded mozzarella cheese (1 cup) evenly on top of sauce.
-
Add pepperoni and remaining cheese: Layer mini pepperoni evenly over the first layer of cheese, slightly overlapping them. Sprinkle remaining 1 cup of mozzarella cheese on top to bind ingredients together.
-
Complete assembly: Place the top half of the rolls over the filling, aligning it with the bottom half to ensure the individual rolls are properly lined up.
-
Prepare herb butter topping: Combine melted butter, grated Parmesan cheese, minced parsley, garlic powder, Italian seasoning, salt, and red pepper flakes in a small bowl. Mix until well combined.
-
Add topping to sliders: Spread the herb butter mixture evenly over the tops of the rolls using a pastry brush or spoon, ensuring the entire surface is covered. Allow some of the mixture to drip down the sides for added flavor and to crisp the edges.
-
Bake covered: Loosely cover the baking dish with aluminum foil, making a tent shape to avoid touching the rolls. Bake in the preheated oven for 20 minutes to prevent the tops from burning and ensure the filling is heated through and the cheese melts.
-
Bake uncovered: Uncover and bake for 5-7 minutes more until the tops of the rolls are golden brown and crispy, and the cheese is melted and bubbly.
-
Rest and serve: Take the sliders out of the oven and allow them to rest for 3-5 minutes. This helps the cheese to set, making cutting and serving easier. Use a sharp knife to separate the sliders by cutting along the seams of the rolls. Serve warm.