Follow Me On Social Media!
Step right up to the most whimsical and delightful treat you’ll ever lay eyes on: Cotton Candy Cake. Yes, you read that correctly – a cake that tastes exactly like the sweet, fluffy clouds of pink and blue cotton candy you’d find at a carnival. This recipe is a true showstopper, with layers of light and airy cake infused with cotton candy flavoring, topped with a dreamy cotton candy buttercream frosting that’s as beautiful as it is delicious.
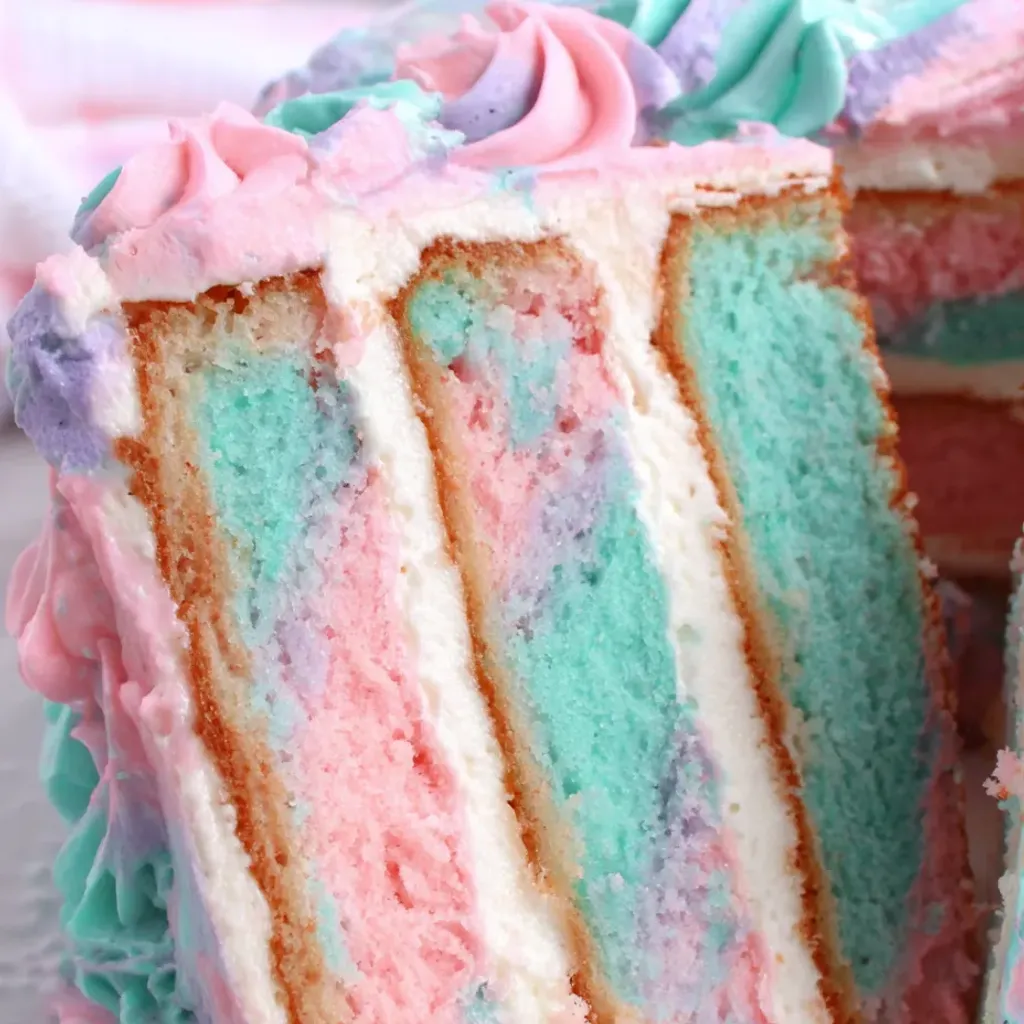
Imagine cutting into a cake that reveals swirls of pastel colors reminiscent of your favorite childhood treat, eliciting gasps of awe and delight from both kids and adults alike. It’s the perfect centerpiece for any celebration, from birthday parties to baby showers, where a touch of whimsy and fun is needed. And let’s not forget that each bite is a burst of nostalgia, transporting you back to carefree days spent wandering the fairgrounds with sticky fingers and sugary smiles.
So, whether you’re hosting a carnival-themed extravaganza or simply want to add a touch of magic to your dessert table, this Cotton Candy Cake is sure to steal the show. Trust me, it’s a crowd-pleaser that will have everyone coming back for seconds and begging for the recipe. Just remember, don’t skip the pink food coloring – it’s the secret to those picture-perfect pastel swirls that make this cake truly unforgettable.
Quick Benefits
- Nostalgic Carnival Flavor: Experience the taste of cotton candy in a cake form, taking you back to the fun and excitement of the county fair.
- Beautiful Pastel Colors: Enjoy visually stunning cake layers with soft pastel swirls that create a whimsical and captivating appearance.
- Moist and Light Texture: Indulge in a cake that is incredibly light and moist, staying fresh for days without drying out, making it a crowd-pleaser at any celebration.
- Crowd-Pleasing: Delight both kids and adults with a flavor that appeals to all ages, making it an ideal centerpiece dessert for various events and celebrations.
Why You’ll Love This Colorful Cotton Candy Cake: A Sweet and Fun Delight Recipe
- Nostalgic Carnival Flavor: Taste the nostalgia of cotton candy in a cake form, bringing back memories of county fairs and childhood joy.
- Light and Fluffy Texture: Enjoy a delicate and airy cake that melts in your mouth, creating a delightful eating experience.
- Dreamy Watercolor Effect: Admire the visually stunning swirls of pastel colors in both the cake layers and the buttercream frosting, adding an artistic touch to your dessert.
- Kid-Friendly Appeal: Witness children’s enthusiastic reactions as they devour their entire slice and come back for seconds, making it a hit at kids’ parties.
- Picky Eater Approved: Convince even picky eaters to love cake with this recipe, as they willingly indulge in the delightful flavors and textures.
- Impressive Presentation: Serve slices of this cake at celebrations to awe your guests with its whimsical and fun appearance, perfect for birthdays, baby showers, or carnival-themed events.
- Versatile Dessert: Pair slices with beverages like cold milk or hot tea, offering a versatile dessert option for various occasions and preferences.
- Authentic Cotton Candy Flavor: Experience the genuine taste of cotton candy without any artificial or chemical aftertaste, achieving the challenging balance of novelty flavors.
- Long-Lasting Freshness: Enjoy the cake’s moist and fresh texture for days after baking, ensuring that it stays delicious without drying out.
- Ease of Preparation: Create a show-stopping cake without much difficulty by following the steps precisely, making it a go-to recipe for your signature celebration cakes.
Ingredients for Colorful Cotton Candy Cake: A Sweet and Fun Delight
For the Cotton Candy Cake
- 1 1/2 cups (300g) granulated sugar
- 1/2 cup (120ml) vegetable oil
- 4 large egg whites, room temperature
- 2 1/2 cups (265g) sifted cake flour
- 1 tablespoon cotton candy flavoring
- 2 teaspoons baking powder
- 1 1/4 cups (300ml) full-fat buttermilk, room temperature
- 1/2 teaspoon baking soda
- 1/2 cup (113g) unsalted butter, room temperature
- 1 drop pink food coloring gel
- 1 drop blue food coloring gel
- 1/2 teaspoon salt
For the Cotton Candy Buttercream
- 2 cups (452g) unsalted butter, room temperature
- 4 tablespoons whole milk, room temperature
- 1 teaspoon cotton candy flavoring
- 7 cups (840g) powdered sugar
- 1/4 teaspoon salt
- 1 small drop blue food coloring gel
- 1 small drop purple food coloring gel
For Topping
- 1 cup cotton candy
How to Make Colorful Cotton Candy Cake: A Sweet and Fun Delight
Step 1: Get Ready to Bake
Preheat oven to 350°F. Grease and line cake pans with parchment paper.
Step 2: Mix the Dry Ingredients
Combine cake flour, baking powder, baking soda, and salt in a medium bowl. Set aside.
Step 3: Cream the Butter and Sugar
Using a stand mixer with the paddle attachment, beat butter on high speed for 2 minutes until creamy. Add sugar and beat on medium-high speed for another 2 minutes until light and fluffy, scraping down the bowl and paddle halfway through.
Step 4: Add the Wet Ingredients
Mix egg whites into mixer on low speed one at a time until combined, scraping the bowl as needed. Add vegetable oil and cotton candy flavoring. Beat on high speed for 1 minute.
Step 5: Combine Everything
Stop the mixer and add all the flour mixture to it. Mix on low speed until just combined. Slowly pour in the buttermilk and continue mixing on low for about 30 seconds until the batter is smooth. The batter will be slightly thin.
Step 6: Color the Batter
Divide the batter evenly between two bowls. Add one drop of pink food coloring to one bowl and mix until evenly colored. Add one drop of blue food coloring to the other bowl and mix until uniform. Note that the blue may appear purplish when mixed, but only the blue will be visible after baking.
Step 7: Layer the Batter
Using a half-cup measuring cup, place pink batter in each pan, followed by blue batter, alternating colors until all batter is used.
Step 8: Bake the Cakes
Bake for 28-32 minutes until cakes spring back when touched and a toothpick inserted in the center comes out clean or with a few moist crumbs. Allow to cool in pans for 5 minutes, then transfer to wire rack to cool completely.
Step 9: Start the Buttercream
Beat butter with a hand mixer or stand mixer using the paddle attachment on medium-high speed for approximately 7 minutes until creamy and almost white in color.
Step 10: Add Sugar and Milk
Gradually add powdered sugar to mixer on low speed, scraping bowl between additions. Mix until fully combined. Add milk and salt, mix on low until incorporated.
Step 11: Flavor the Buttercream
For watercolor frosting, reserve 1 cup of plain white buttercream. Mix cotton candy flavoring into the remaining buttercream on low until combined and turns pink. For regular frosting, add the flavoring to the entire batch.
Step 12: Level and Fill the Cake
After cooling the cake layers, level them to your preferred height. Place a small amount of buttercream on a cake board and position the first layer on top. Spread approximately 3/4 cup of buttercream on the layer, smoothing it to 1/2 inch thickness. Repeat this process with the following layers. Once all layers are stacked, apply a thin crumb coat of buttercream to the entire cake and refrigerate for a minimum of 30 minutes.
Step 13: Create the Watercolor Look
Split the remaining white buttercream into two bowls. Add a small drop of purple food coloring to one bowl and a drop of blue to the other. Combine these colored frostings with the pink cotton candy buttercream to achieve a watercolor design on the cake.
Step 14: Final Touches
Chill the cake for 20 minutes to set the buttercream. Use a piping bag with a large star tip to pipe swirls along the top edge of the cake. Just before serving or taking photos, add a generous amount of cotton candy on top. The cotton candy will maintain its appearance for approximately one hour.
Storage Tips
Once you have made the cotton candy cake, it is important to store it properly to maintain its freshness and flavor. To store the finished cake, place it in an airtight cake container or cover it tightly with plastic wrap. This will help prevent the cake from drying out and absorbing any odors from the refrigerator.
It is recommended to store the cotton candy cake in the refrigerator if you are not serving it immediately. The cake can be stored in the fridge for up to 3-4 days. Before serving, allow the cake to come to room temperature for about 30 minutes to ensure the best texture and flavor.
If you have leftover slices of the cotton candy cake, you can individually wrap them in plastic wrap and store them in an airtight container in the refrigerator. This will help maintain the cake’s freshness and prevent it from drying out. Enjoy the cake within a few days for the best taste and texture.
Ingredient Substitutions
If you are unable to find cotton candy flavoring, a suitable alternative could be using vanilla extract and a few drops of raspberry or strawberry extract to mimic the sweet and fruity essence of cotton candy. This substitution can still provide a similar whimsical and flavorful touch to the cake without compromising the overall taste.
For a dairy-free option, you can replace the buttermilk in the cake batter with a plant-based alternative like almond milk or soy milk mixed with a tablespoon of vinegar or lemon juice to create a buttermilk-like consistency. Similarly, you can use vegan butter in place of regular butter in both the cake and frosting to make the recipe suitable for those with dairy restrictions while maintaining a rich and creamy texture in the final product.
Serving Suggestions
For a whimsical and fun serving suggestion, try topping each slice of cotton candy cake with a small, fluffy cloud of cotton candy before serving. This not only enhances the carnival theme but also adds another layer of sweetness and nostalgia to the dessert. The light and airy cotton candy topping complements the moist and flavorful cake, creating a delightful texture and taste experience for your guests.
To elevate the presentation of your cotton candy cake, consider serving it on a platter adorned with pastel-colored edible flowers and sprinkles. This adds a touch of elegance and charm to the dessert, making it perfect for special occasions like bridal showers, garden parties, or afternoon tea gatherings. The combination of the vibrant colors, floral accents, and whimsical cotton candy theme will surely impress your guests and make the cake the star of the show.
FAQs for Colorful Cotton Candy Cake: A Sweet and Fun Delight
Can I use a different type of food coloring if I don’t have gel colors?
Yes, you can use liquid food coloring instead of gel colors. Just be aware that liquid food coloring is less concentrated than gel, so you may need to add more to achieve the desired color intensity. Start with a small amount and adjust as needed.
Can I substitute the cotton candy flavoring with vanilla extract?
While vanilla extract is a common substitute for many flavors, in this specific recipe, the cotton candy flavoring is what gives the cake its unique taste. It’s recommended to use cotton candy flavoring to achieve the intended nostalgic carnival flavor.
How should I store the cotton candy cake to keep it fresh?
To keep the cotton candy cake fresh, store it in an airtight container or cover it with plastic wrap at room temperature for up to 2-3 days. If you need to store it longer, you can refrigerate it for up to a week. Just make sure to bring it to room temperature before serving for the best taste and texture.
Can I make this cotton candy cake in advance and freeze it?
Yes, you can make the cake layers in advance, let them cool completely, wrap them tightly in plastic wrap, and freeze them for up to a month. Thaw the cake layers in the refrigerator overnight before assembling the cake. However, it’s best to make the frosting fresh for the best consistency and flavor.
Conclusion
Cotton Candy Cake truly embodies the whimsy and joy of a carnival in every bite. The soft pastel colors and sweet cotton candy flavor bring a sense of nostalgia and fun to any celebration. Don’t be afraid to get creative with the swirling colors and the dreamy watercolor effect of the frosting – it’s all part of the magic of this delightful cake.
Whether you’re hosting a birthday party, baby shower, or simply want to spread some happiness, Cotton Candy Cake is sure to be a hit with both kids and adults alike. So go ahead, give this recipe a try and witness the smiles and gasps of delight as you unveil this beautiful and delicious treat. Let the Cotton Candy Cake be the star of your next event, creating sweet memories that will last a lifetime.
Colorful Cotton Candy Cake: A Sweet and Fun Delight
“Light and fluffy cotton candy cake with dreamy watercolor buttercream frosting, a nostalgic carnival flavor that mesmerizes both kids and adults.”
Prep Time45 Minutes
Cook Time35 Minutes
Total Time80 Minutes
CuisineAmerican
Skill LevelEasy
Servings15 Servings (1 layered cake (15 slices))
Ingredients
For the Cotton Candy Cake
- 1 1/2 cups (300g) granulated sugar
- 1/2 cup (120ml) vegetable oil
- 4 large egg whites, room temperature
- 2 1/2 cups (265g) sifted cake flour
- 1 tablespoon cotton candy flavoring
- 2 teaspoons baking powder
- 1 1/4 cups (300ml) full-fat buttermilk, room temperature
- 1/2 teaspoon baking soda
- 1/2 cup (113g) unsalted butter, room temperature
- 1 drop pink food coloring gel
- 1 drop blue food coloring gel
- 1/2 teaspoon salt
For the Cotton Candy Buttercream
- 2 cups (452g) unsalted butter, room temperature
- 4 tablespoons whole milk, room temperature
- 1 teaspoon cotton candy flavoring
- 7 cups (840g) powdered sugar
- 1/4 teaspoon salt
- 1 small drop blue food coloring gel
- 1 small drop purple food coloring gel
For Topping
- 1 cup cotton candy
Instructions
-
Get Ready to Bake: Preheat oven to 350°F. Grease and line cake pans with parchment paper.
-
Mix the Dry Ingredients: Combine cake flour, baking powder, baking soda, and salt in a medium bowl. Set aside.
-
Cream the Butter and Sugar: Using a stand mixer with the paddle attachment, beat butter on high speed for 2 minutes until creamy. Add sugar and beat on medium-high speed for another 2 minutes until light and fluffy, scraping down the bowl and paddle halfway through.
-
Add the Wet Ingredients: Mix egg whites into mixer on low speed one at a time until combined, scraping the bowl as needed. Add vegetable oil and cotton candy flavoring. Beat on high speed for 1 minute.
-
Combine Everything: Stop the mixer and add all the flour mixture to it. Mix on low speed until just combined. Slowly pour in the buttermilk and continue mixing on low for about 30 seconds until the batter is smooth. The batter will be slightly thin.
-
Color the Batter: Divide the batter evenly between two bowls. Add one drop of pink food coloring to one bowl and mix until evenly colored. Add one drop of blue food coloring to the other bowl and mix until uniform. Note that the blue may appear purplish when mixed, but only the blue will be visible after baking.
-
Layer the Batter: Using a half-cup measuring cup, place pink batter in each pan, followed by blue batter, alternating colors until all batter is used.
-
Bake the Cakes: Bake for 28-32 minutes until cakes spring back when touched and a toothpick inserted in the center comes out clean or with a few moist crumbs. Allow to cool in pans for 5 minutes, then transfer to wire rack to cool completely.
-
Start the Buttercream: Beat butter with a hand mixer or stand mixer using the paddle attachment on medium-high speed for approximately 7 minutes until creamy and almost white in color.
-
Add Sugar and Milk: Gradually add powdered sugar to mixer on low speed, scraping bowl between additions. Mix until fully combined. Add milk and salt, mix on low until incorporated.
-
Flavor the Buttercream: For watercolor frosting, reserve 1 cup of plain white buttercream. Mix cotton candy flavoring into the remaining buttercream on low until combined and turns pink. For regular frosting, add the flavoring to the entire batch.
-
Level and Fill the Cake: After cooling the cake layers, level them to your preferred height. Place a small amount of buttercream on a cake board and position the first layer on top. Spread approximately 3/4 cup of buttercream on the layer, smoothing it to 1/2 inch thickness. Repeat this process with the following layers. Once all layers are stacked, apply a thin crumb coat of buttercream to the entire cake and refrigerate for a minimum of 30 minutes.
-
Create the Watercolor Look: Split the remaining white buttercream into two bowls. Add a small drop of purple food coloring to one bowl and a drop of blue to the other. Combine these colored frostings with the pink cotton candy buttercream to achieve a watercolor design on the cake.
-
Final Touches: Chill the cake for 20 minutes to set the buttercream. Use a piping bag with a large star tip to pipe swirls along the top edge of the cake. Just before serving or taking photos, add a generous amount of cotton candy on top. The cotton candy will maintain its appearance for approximately one hour.