Follow Me On Social Media!
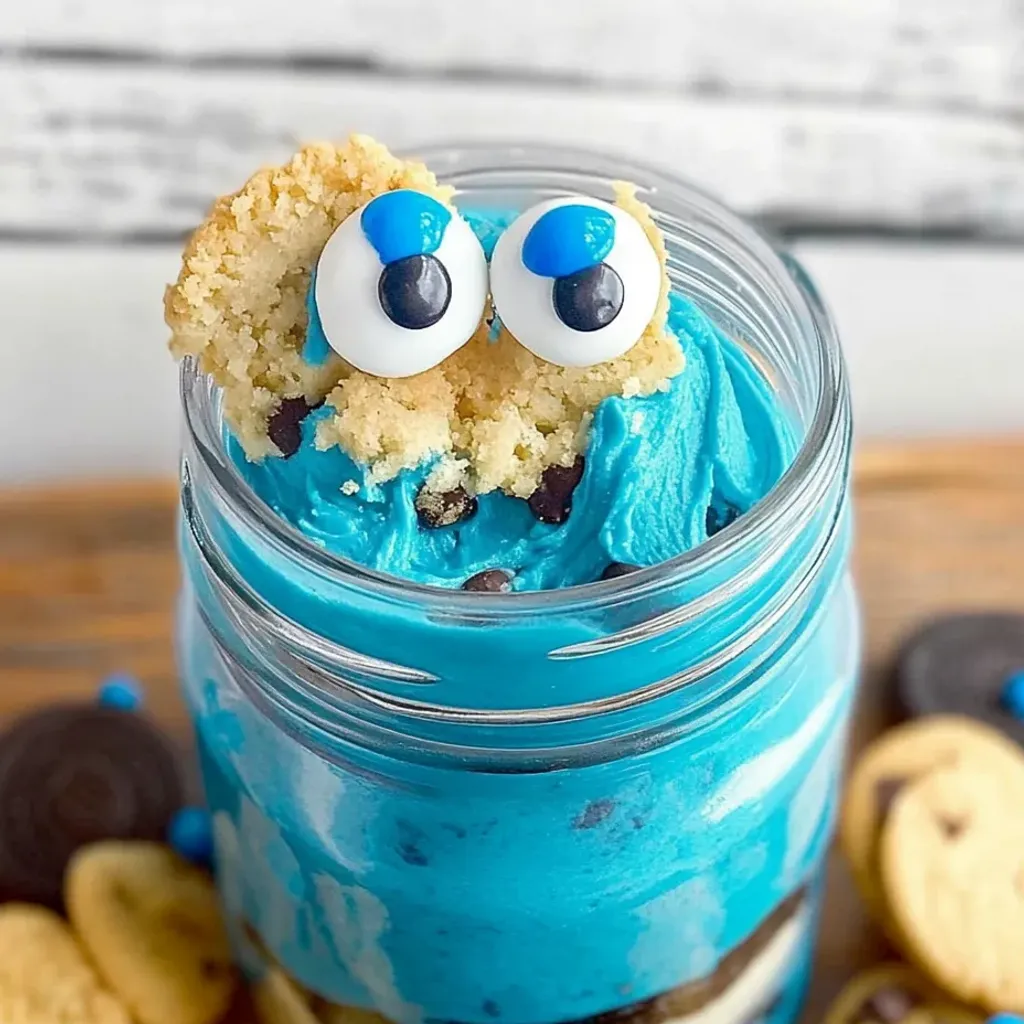
Are you ready to unleash your inner Cookie Monster and dive into a dessert adventure like no other? Look no further than these delightful Cookie Monster Cake Jars! I first whipped up these jars of joy for my nephew’s birthday bash, and ever since then, they’ve been stealing the spotlight at gatherings galore. Picture this: layers of moist vanilla cake speckled with chunks of Oreo cookies, swirled with silky blue frosting, and topped with a medley of cookie crumbles. These jars are not just a treat for the taste buds but also a feast for the eyes.
These Cookie Monster Cake Jars have a magical effect on anyone who lays eyes on them. I’ve witnessed grown-ups turning into sneaky cookie-snatchers at parties, unable to resist the allure of these whimsical creations. With a recipe that strikes the perfect balance of simplicity and show-stopping appeal, these jars are sure to impress without keeping you chained to the kitchen for hours. So, roll up your sleeves, gather your ingredients, and get ready to embark on a baking journey that promises fun, flavor, and a touch of nostalgia. Cookie Monster Cake Jars await – let’s satisfy those sweet cravings!
Quick Benefits
- Fun and Whimsical Presentation: The vibrant blue layers and googly eyes make these Cookie Monster Cake Jars visually appealing and perfect for celebrations.
- Delicious Flavor Combination: The moist vanilla cake with Oreo pieces, silky blue frosting, and chunks of cookies create a delightful and nostalgic taste experience.
- Simple to Make, Impressive Results: Despite their impressive appearance, these cake jars are surprisingly easy to assemble, making them ideal for impressing a crowd without spending hours in the kitchen.
- Versatile and Customizable: The recipe offers endless variations, such as using different cake flavors, adding layers of cookie dough, or adjusting the frosting for different occasions and preferences.
Why You’ll Love This Delicious Cookie Monster Cake Jars Recipe Recipe
- Irresistibly Fun and Adorable: The vibrant blue layered treat with cookie chunks and candy eyes appeals to the kid in everyone.
- Delicious Flavor Explosion: Moist vanilla cake with Oreo pieces, silky blue frosting, and chunks of cookies create a dessert that’s not just visually stunning but also absolutely delicious.
- Simple Yet Impressive: Surprisingly simple to make but looks like you spent hours on them, perfect for impressing a crowd without much effort.
- Crowd-Pleaser: These Cookie Monster Cake Jars disappear quickly at gatherings; even adults can’t resist sneaking back for more.
- Versatile and Customizable: Experiment with different cookie combinations, cake flavors, and frosting variations to suit different occasions and preferences.
- Perfect for Parties and Events: Ideal for children’s birthdays, classroom parties, adult gatherings, and even as gifts, these jars are versatile and visually appealing.
- Make-Ahead and Portable: Can be made ahead of time with flavors improving over time; remains perfect for up to five days when stored properly, making it a convenient dessert for events.
- Creative Presentation Ideas: Transform the jars into an impressive dessert with cookie garnishes, tiered stands, and themed decorations; offering a “decorate your own” station adds a fun element to children’s parties.
Ingredients for Delicious Cookie Monster Cake Jars Recipe
For the Cake
- Ingredients called for on cake mix box (typically eggs, oil, and water)
- 10 Oreos, chopped (divided)
- 15 oz box white or vanilla cake mix
For the Blue Cookie Monster Frosting
- 1 drop electric blue Americolor gel color
- ½ cup vegetable shortening
- 1 teaspoon vanilla extract
- 2-3 tablespoons milk or coffee creamer
- ½ cup (1 stick) unsalted butter, room temperature
- 2 drops royal blue Chef Masters gel color
- 3 cups powdered sugar
For Assembly
- Glue dots (optional, for securing ribbon)
- Blue ribbon (optional, for decorating jars)
- 8-10 chocolate chip cookies, chopped
- 8-10 Oreos, chopped
- 2 chocolate chip cookies, cut in half
- 8 candy eyes
How to Make Delicious Cookie Monster Cake Jars Recipe
Step 1: Prepare the cake
Prepare the cake batter according to the instructions on the box. Then, gently fold in 5 chopped Oreos, using half of the amount intended for the cake.
Step 2: Bake the cake
Transfer the batter to the prepared pan(s) and bake following the package directions. Let the cake cool completely for at least 30 minutes before assembling.
Step 3: Make the blue Cookie Monster frosting
Combine room temperature butter and vegetable shortening in a large mixing bowl. Mix until smooth and well incorporated.
Step 4: Add sugar and vanilla
Combine one cup of powdered sugar and vanilla extract with the butter mixture. Mix on low speed, gradually increasing to medium speed until fully combined.
Step 5: Complete the frosting
Incorporate the last 2 cups of powdered sugar, 2 tablespoons of milk or coffee creamer, and both gel food colorings. Begin mixing on low speed, gradually increasing to high, and beat for 2-3 minutes.
Step 6: Check frosting consistency
Check the frosting’s texture with a spoon. If it’s not smooth enough, add one more tablespoon of milk and beat on medium-high for 4-5 minutes until fluffy and easy to pipe.
Step 7: Prepare for assembly
Transfer the blue frosting into a piping bag with tip 1M or your desired tip. Prepare mason jars, chopped cookies, cake, and decorations for assembly.
Step 8: Begin jar assembly
Place 1-2 scoops of crumbled cake into each mason jar and gently press down to compact.
Step 9: Add first frosting and cookie layer
Pipe frosting onto the cake layer and sprinkle with chopped chocolate chip cookies and chopped Oreo cookies.
Step 10: Continue layering
Layer another scoop of cake, frosting, and cookies in the jar. Repeat if there is room. Finish with a decorative swirl of blue frosting.
Step 11: Add Cookie Monster features
Place two candy eyeballs on top of the frosting and position half of a chocolate chip cookie beneath them to form Cookie Monster’s face.
Step 12: Decorate jars (optional)
Finish by wrapping blue ribbon around the rim of each jar and securing it with glue dots.
Storage Tips
Once you have made these delightful Cookie Monster Cake Jars, it is important to store them properly to maintain their texture and flavor. These cake jars can be stored in the refrigerator with their lids tightly secured for up to five days. The flavors of the cake, frosting, and cookies actually meld and improve after the first day, making them a great make-ahead dessert for parties or gatherings. If you plan to store them for longer periods, it is advisable to wait and add the cookie garnish on top just before serving to ensure it retains its crunchiness.
When transporting the Cookie Monster Cake Jars to events or parties, it is recommended to place them in a shallow box with dividers. This will help prevent any tipping or jostling that could disturb the layers and decorations. By taking these storage and transportation precautions, you can ensure that your cake jars remain visually appealing and delicious for everyone to enjoy, whether it’s a children’s birthday party, a classroom celebration, or an adult gathering.
Ingredient Substitutions
If you need to make these Cookie Monster Cake Jars without using vegetable shortening, you can substitute it with an equal amount of softened unsalted butter. This swap will alter the texture slightly but will still result in a delicious frosting. Additionally, if you prefer not to use food coloring, you can omit the electric blue and royal blue gel colors and achieve a similar look by using natural blue food coloring alternatives like butterfly pea flower extract or blue spirulina powder. This will give your cake jars a vibrant blue hue without artificial colors.
For a gluten-free version of these Cookie Monster Cake Jars, you can use a gluten-free white or vanilla cake mix instead of the regular one called for in the recipe. Ensure all other ingredients are also gluten-free to maintain the integrity of the dish. Furthermore, if you want to make a dairy-free version, you can substitute the unsalted butter with dairy-free margarine or coconut oil, and use a plant-based milk or dairy-free coffee creamer in place of regular milk. These substitutions will cater to individuals with dietary restrictions while still delivering a tasty treat for everyone to enjoy.
Serving Suggestions
For an extra special touch to your Cookie Monster Cake Jars, garnish each jar with a mini chocolate chip cookie perched on top of the frosting. To elevate the presentation for a Cookie Monster themed party, arrange the jars on a tiered stand with cookies scattered around the base. Incorporate blue and white striped paper straws for a festive and cohesive look. If you’re planning to gift these adorable treats, consider tying a ribbon around the lid of each jar and attaching a small wooden spoon for an added charm.
To make children’s parties even more interactive and fun, set up a “decorate your own” station where kids can personalize their Cookie Monster Cake Jars by adding their own candy eyes and cookie pieces to pre-filled jars. This hands-on activity will not only keep the little ones entertained but also allow them to unleash their creativity. The colorful and playful nature of these dessert jars will surely make your gathering a memorable and delightful event for guests of all ages.
FAQs for Delicious Cookie Monster Cake Jars Recipe
Can I use a different type of cake mix for this recipe?
Yes, you can use a different type of cake mix like chocolate or funfetti if you prefer. Just keep in mind that it will alter the flavor profile of the Cookie Monster Cake Jars.
How long can I store the Cookie Monster Cake Jars for?
These cake jars can be stored in the refrigerator with the lids tightly secured for up to five days. The flavors actually meld and improve after the first day, making them an ideal make-ahead dessert.
Can I make these ahead of time for an event?
Yes, you can make these ahead of time. If making them more than a day ahead, wait to add the cookie garnish on top until just before serving to maintain its crunch. For transporting to events, place the jars in a shallow box with dividers to prevent tipping or jostling.
What are some creative variations I can try with this recipe?
You can try creative variations like using chocolate cake instead of vanilla, adding a layer of cookie dough between the cake and frosting, incorporating Irish cream into the frosting, or customizing the colors and cookies to match different seasons or occasions.
Conclusion
As you embark on your own Cookie Monster Cake Jars baking adventure, remember that the joy these treats bring is as much in the process as in the delicious end result. Don’t be afraid to get a little messy with the frosting or to improvise with your favorite cookie combinations – that’s part of the fun! The beauty of these jars lies in their ability to spark delight and create lasting memories, whether shared with friends at a party or savored quietly at home.
So go ahead, unleash your inner cookie monster and dive into making these whimsical and scrumptious Cookie Monster Cake Jars. With their vibrant blue layers, hidden cookie surprises, and adorable googly eyes, they are sure to be a hit at any occasion. Let the simplicity and charm of this recipe shine through, and don’t forget to enjoy every sweet bite of these delightful treats. Happy baking, and may your Cookie Monster Cake Jars bring smiles and happiness to all who taste them!
Delicious Cookie Monster Cake Jars Recipe
Indulge in layers of moist vanilla cake, vibrant blue frosting, and chunks of cookies with these adorable and delicious Cookie Monster Cake Jars!
Prep Time30 Minutes
Cook Time25 Minutes
Total Time55 Minutes
CuisineAmerican
Skill LevelEasy
Servings8 Servings (8 cake jars)
Ingredients
For the Cake
- Ingredients called for on cake mix box (typically eggs, oil, and water)
- 10 Oreos, chopped (divided)
- 15 oz box white or vanilla cake mix
For the Blue Cookie Monster Frosting
- 1 drop electric blue Americolor gel color
- ½ cup vegetable shortening
- 1 teaspoon vanilla extract
- 2-3 tablespoons milk or coffee creamer
- ½ cup (1 stick) unsalted butter, room temperature
- 2 drops royal blue Chef Masters gel color
- 3 cups powdered sugar
For Assembly
- Glue dots (optional, for securing ribbon)
- Blue ribbon (optional, for decorating jars)
- 8-10 chocolate chip cookies, chopped
- 8-10 Oreos, chopped
- 2 chocolate chip cookies, cut in half
- 8 candy eyes
Instructions
-
Prepare the cake: Prepare the cake batter according to the instructions on the box. Then, gently fold in 5 chopped Oreos, using half of the amount intended for the cake.
-
Bake the cake: Transfer the batter to the prepared pan(s) and bake following the package directions. Let the cake cool completely for at least 30 minutes before assembling.
-
Make the blue Cookie Monster frosting: Combine room temperature butter and vegetable shortening in a large mixing bowl. Mix until smooth and well incorporated.
-
Add sugar and vanilla: Combine one cup of powdered sugar and vanilla extract with the butter mixture. Mix on low speed, gradually increasing to medium speed until fully combined.
-
Complete the frosting: Incorporate the last 2 cups of powdered sugar, 2 tablespoons of milk or coffee creamer, and both gel food colorings. Begin mixing on low speed, gradually increasing to high, and beat for 2-3 minutes.
-
Check frosting consistency: Check the frosting’s texture with a spoon. If it’s not smooth enough, add one more tablespoon of milk and beat on medium-high for 4-5 minutes until fluffy and easy to pipe.
-
Prepare for assembly: Transfer the blue frosting into a piping bag with tip 1M or your desired tip. Prepare mason jars, chopped cookies, cake, and decorations for assembly.
-
Begin jar assembly: Place 1-2 scoops of crumbled cake into each mason jar and gently press down to compact.
-
Add first frosting and cookie layer: Pipe frosting onto the cake layer and sprinkle with chopped chocolate chip cookies and chopped Oreo cookies.
-
Continue layering: Layer another scoop of cake, frosting, and cookies in the jar. Repeat if there is room. Finish with a decorative swirl of blue frosting.
-
Add Cookie Monster features: Place two candy eyeballs on top of the frosting and position half of a chocolate chip cookie beneath them to form Cookie Monster’s face.
-
Decorate jars (optional): Finish by wrapping blue ribbon around the rim of each jar and securing it with glue dots.