Follow Me On Social Media!
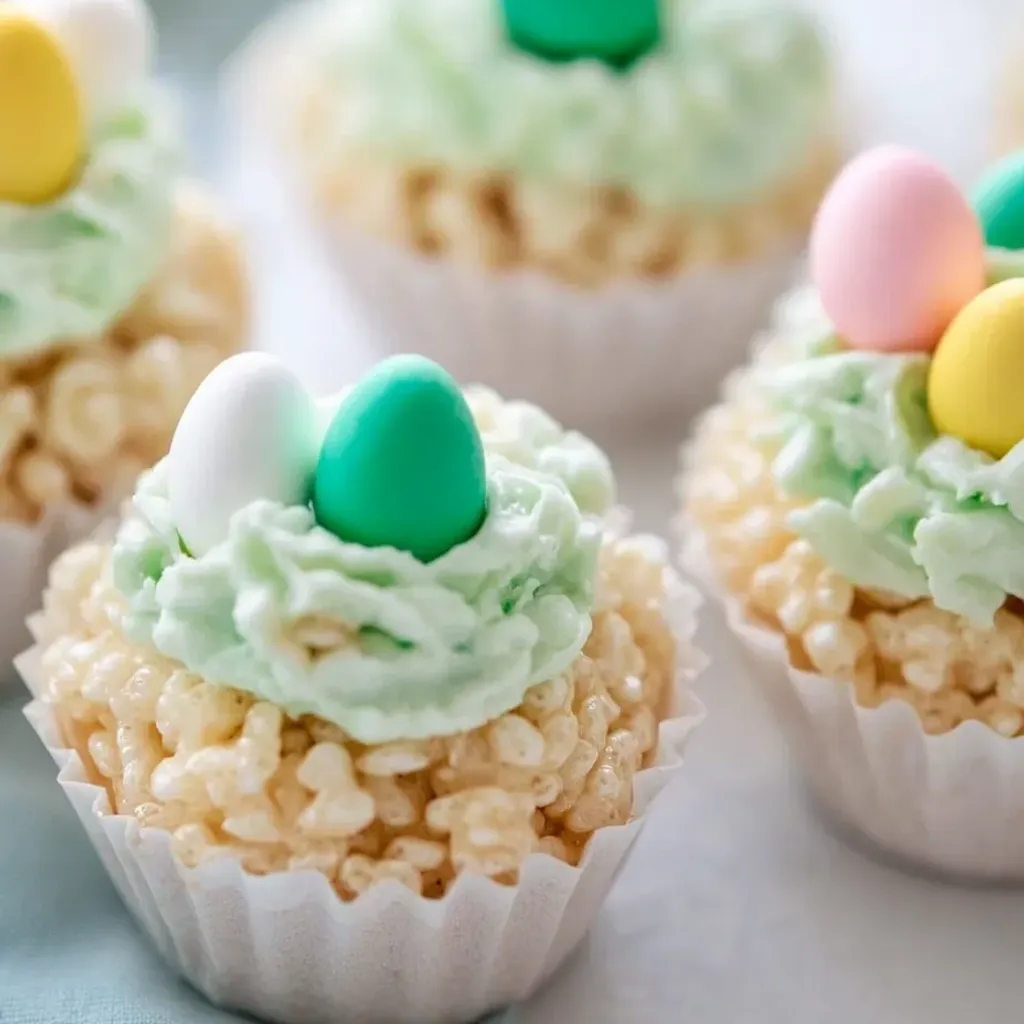
Looking to add a touch of whimsy to your Easter table this year? Look no further than these charming Easter Rice Krispie Treats! As a food blogger and lover of all things festive, I can attest that these crispy marshmallow nests topped with buttercream “grass” and sweet candy eggs are not only a treat for the taste buds but also a feast for the eyes. The nostalgic flavor of traditional Rice Krispie treats gets a delightful spring makeover with this recipe.
I stumbled upon these adorable Easter Rice Krispie Treats while searching for a creative alternative to the usual Easter candies. These treats have become a staple at our family gatherings, eliciting smiles and creating cherished memories year after year. Whether you’re preparing them for a kids’ Easter egg hunt or a sophisticated brunch with friends, these delightful nests are sure to be a hit. Join me in spreading the Easter joy with these festive and effortless treats that are as fun to make as they are to eat!
Quick Benefits
- Easy and quick to make, perfect for busy holiday preparations
- Adorable and impressive Easter table centerpiece
- Versatile – can be customized with different flavors and decorations
- Crowd-pleaser for both kids and adults, bringing out childlike joy in everyone
Why You’ll Love This Easter Rice Krispie Treats Recipe Recipe
- Perfect for Easter Celebrations: This recipe is a delightful and festive addition to any Easter gathering, bringing a whimsical touch to your dessert table.
- Kid-Friendly Activity: Kids will love helping to create these adorable nests, making it a fun and interactive activity for the whole family.
- Nostalgic Flavor: Combining the classic taste of Rice Krispie treats with a festive spring presentation, these treats evoke nostalgia while offering a unique twist.
- Impressive Presentation: The buttercream grass and candy eggs on top of the crispy marshmallow nests create a visually stunning centerpiece that will impress your guests.
- Versatile Options: Experiment with different variations like chocolate nests using Cocoa Krispies or fruity nests with Fruity Pebbles, adding orange or lemon zest for a citrusy kick.
- Minimal Effort, Maximum Impact: Despite looking impressive, these treats require minimal effort to make, perfect for busy holiday preparations.
- Great for Sharing: These treats are perfect for sharing at school functions, family gatherings, or adult Easter brunches, appealing to people of all ages.
- Foolproof Tips: The recipe includes helpful tips like buttering the pans well and warming the measuring cup to make the process smoother, ensuring a successful outcome every time.
- Make Ahead: With tips on storage and transportation, you can easily make these nests ahead of time, allowing you to focus on other preparations while still serving a delicious treat.
Ingredients for Easter Rice Krispie Treats Recipe
For the Rice Krispie Nests
- 7 cups Rice Krispies cereal
- 2 tablespoons unsalted butter
- 16 ounces marshmallows (jumbo or mini both work)
For the Buttercream Frosting
- ½ cup unsalted butter
- 3-4 cups powdered sugar
- Green food coloring
- 1 teaspoon vanilla extract
- ¼ cup milk
For Decorating
- Easter egg candies (mini chocolate eggs or jelly beans)
How to Make Easter Rice Krispie Treats Recipe
Step 1: Prepare the pans
Grease cupcake pans with butter or cooking spray. Set aside.
Step 2: Make the Rice Krispie mixture
Put marshmallows and butter in a large microwave-safe bowl. Microwave for about 2 minutes, watching closely to prevent overflow. Stir until fully melted and combined.
Step 3: Add the cereal
Add the Rice Krispies cereal to the melted marshmallow mixture and mix thoroughly until the cereal is evenly coated.
Step 4: Form the nests
While the mixture is still warm, spoon it into greased cupcake pans, pressing down in the center with a piece of wax paper to create a nest shape. Allow it to set for at least 30 minutes.
Step 5: Prepare the buttercream
Combine butter, milk, vanilla extract, and 2 cups of powdered sugar in a large bowl. Mix until smooth and creamy for about 5 minutes. Then, add the remaining powdered sugar and green food coloring. Beat until desired consistency and color achieved.
Step 6: Decorate the nests
After the Rice Krispie nests have hardened, gently take them out of the cupcake pans. Fill each nest with green buttercream frosting to create a grass-like appearance. Finish by adding Easter egg candies on top.
Step 7: Serve and enjoy
Let the frosting firm up a bit before serving. Enjoy these Easter treats!
Storage Tips
After making these delightful Easter Rice Krispie Treats, it’s important to store them properly to maintain freshness. To store the finished nests, place them in a single layer in an airtight container at room temperature. This will keep them fresh for 2-3 days, although the Rice Krispie base may become firmer over time. Avoid refrigerating the treats as cold temperatures can cause them to become hard and less enjoyable.
If you need to make the nests ahead of time, it’s best to prepare them and store them without the frosting and candy eggs. Add the decorations within a few hours of serving to keep them looking their best. During warmer weather, store the treats in the coolest part of your kitchen away from direct sunlight to prevent the frosting from melting or sliding off. If you need to transport the nests, a shallow box with a tight-fitting lid will work well to keep them safe and intact on the go. Enjoy these whimsical treats at various gatherings, knowing how to store them to preserve their deliciousness.
Ingredient Substitutions
If you are looking to make a healthier version of these Easter Rice Krispie Treats, you can consider using brown rice crisps or a whole grain crispy rice cereal as a substitute for the traditional Rice Krispies. This swap will add a nutty and hearty flavor to the treats while increasing the fiber content. Additionally, you can replace the marshmallows with a vegan marshmallow alternative or a mixture of honey and nut butter for a more natural sweetener option.
For those with dietary restrictions or preferences, you can easily customize the toppings of these Easter nests. Instead of buttercream frosting, you can use a dairy-free frosting made from coconut cream or a simple glaze made with powdered sugar and plant-based milk. Feel free to get creative with the decorations by using different types of colorful candies or sprinkles to suit your taste or the occasion. By experimenting with these ingredient substitutions, you can personalize the treats to cater to various dietary needs and flavor preferences while still maintaining the festive and fun spirit of the original recipe.
Serving Suggestions
For a creative serving suggestion, consider making a charming Easter dessert display by placing these Rice Krispie nests on a bed of edible green coconut grass. Simply toss shredded coconut with a few drops of green food coloring until evenly tinted, then scatter it around the nests on a platter for a festive and whimsical presentation. This extra touch adds a pop of color and texture that enhances the springtime theme of the treats, making them even more visually appealing and delightful for your Easter gathering.
Another fun idea is to turn these Easter Rice Krispie treats into a DIY decorating activity for kids at your holiday celebration. Set up a decorating station with bowls of colorful icing, sprinkles, and assorted candy toppings, allowing little ones to personalize their own nests with creative designs. Not only does this engage children in the kitchen and spark their creativity, but it also adds a personalized touch to the treats, making them even more special and memorable for the young ones at your Easter gathering.
FAQs for Easter Rice Krispie Treats Recipe
Can I use jumbo or mini marshmallows for this recipe?
Yes, both jumbo and mini marshmallows work well for this recipe. Choose whichever size you prefer or have on hand.
How long can I store the assembled nests and how should I store them?
Assembled nests can be stored in a single layer in an airtight container at room temperature for 2-3 days. Avoid refrigerating them as cold temperatures can make the treats too firm. If making ahead, store the undecorated nests and add frosting and candy eggs within a few hours of serving.
Can I use Cocoa Krispies or Fruity Pebbles instead of Rice Krispies for a different flavor?
Absolutely! You can use Cocoa Krispies for chocolate nests or Fruity Pebbles for colorful, speckled nests. Experiment with different flavors to create unique variations of these Easter treats.
Any tips for transporting the nests to a gathering without ruining the decorations?
If you need to transport the nests, place them in a shallow box with a tight-fitting lid. Keep the box in the coolest part of your kitchen away from direct sunlight to prevent the frosting from melting or sliding off during transportation.
Conclusion
As you prepare to create your own batch of delightful Easter Rice Krispie Treats, remember that the joy of this recipe lies not just in its delightful appearance on the dessert table, but in the memories and moments it creates. Whether you’re crafting these treats for a family gathering, a school event, or a casual brunch with friends, the simple charm of these crispy nests is sure to bring smiles and satisfaction to all who enjoy them.
So go ahead, gather your ingredients, and let your creativity blossom as you whip up a batch of these Easter Rice Krispie Treats. Whether you choose to stick with the classic version or experiment with different flavors and decorations, the process of making these treats is as enjoyable as the end result. Embrace the festive spirit of the season and share the love and joy that these treats bring. Easter Rice Krispie Treats are not just a recipe; they are a tradition in the making, waiting for you to create your own sweet memories and moments to cherish for years to come.
Easter Rice Krispie Treats Recipe
“Delightful Easter Rice Krispie Treats with buttercream grass and candy eggs – a whimsical, easy-to-make dessert that captures the joy of spring celebrations.”
Prep Time10 Minutes
Cook Time2 Minutes
Total Time12 Minutes
CuisineAmerican
Skill LevelEasy
Servings30 Servings (30 nests)
Ingredients
For the Rice Krispie Nests
- 7 cups Rice Krispies cereal
- 2 tablespoons unsalted butter
- 16 ounces marshmallows (jumbo or mini both work)
For the Buttercream Frosting
- ½ cup unsalted butter
- 3-4 cups powdered sugar
- Green food coloring
- 1 teaspoon vanilla extract
- ¼ cup milk
For Decorating
- Easter egg candies (mini chocolate eggs or jelly beans)
Instructions
-
Prepare the pans: Grease cupcake pans with butter or cooking spray. Set aside.
-
Make the Rice Krispie mixture: Put marshmallows and butter in a large microwave-safe bowl. Microwave for about 2 minutes, watching closely to prevent overflow. Stir until fully melted and combined.
-
Add the cereal: Add the Rice Krispies cereal to the melted marshmallow mixture and mix thoroughly until the cereal is evenly coated.
-
Form the nests: While the mixture is still warm, spoon it into greased cupcake pans, pressing down in the center with a piece of wax paper to create a nest shape. Allow it to set for at least 30 minutes.
-
Prepare the buttercream: Combine butter, milk, vanilla extract, and 2 cups of powdered sugar in a large bowl. Mix until smooth and creamy for about 5 minutes. Then, add the remaining powdered sugar and green food coloring. Beat until desired consistency and color achieved.
-
Decorate the nests: After the Rice Krispie nests have hardened, gently take them out of the cupcake pans. Fill each nest with green buttercream frosting to create a grass-like appearance. Finish by adding Easter egg candies on top.
-
Serve and enjoy: Let the frosting firm up a bit before serving. Enjoy these Easter treats!