Follow Me On Social Media!
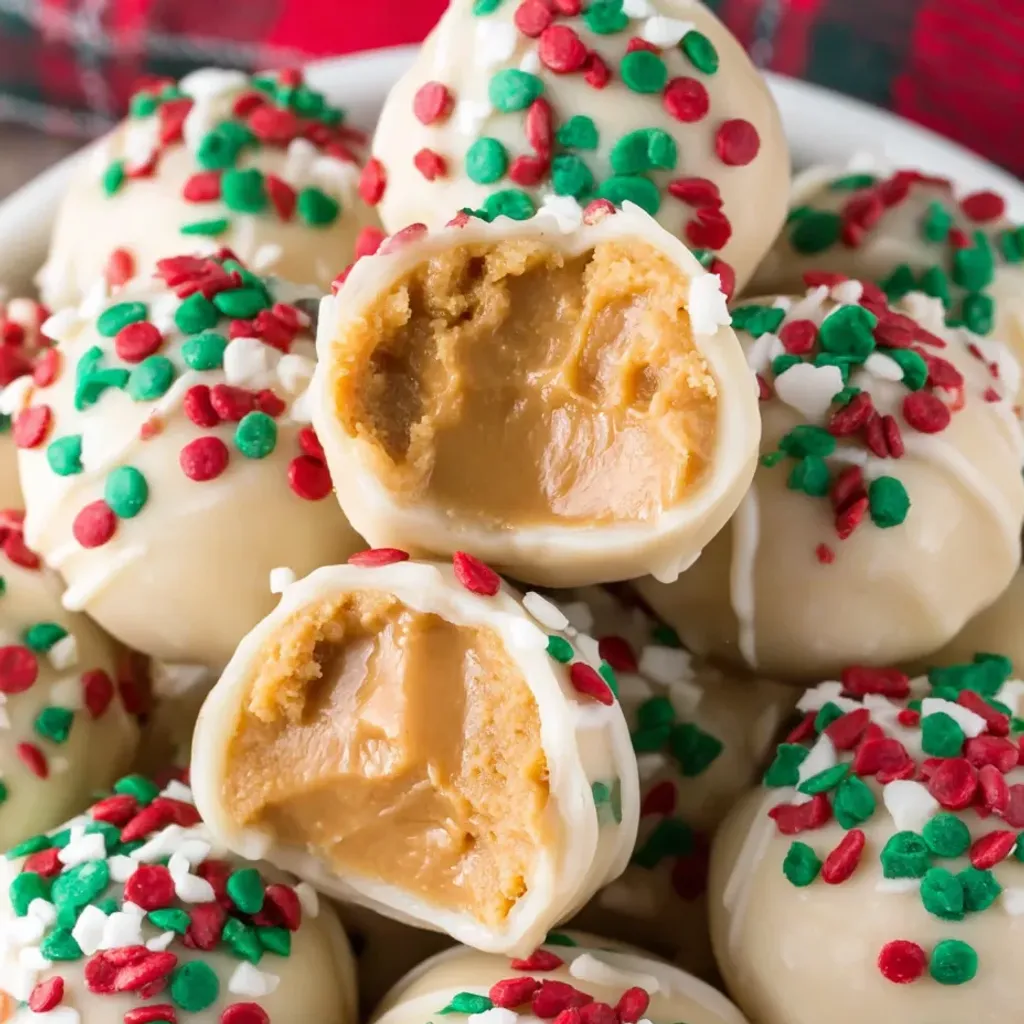
Are you ready to elevate your holiday baking game with a treat that’s as delightful to make as it is to eat? Look no further than Peanut Butter Snowballs! Imagine the irresistible center of a peanut butter cup, coated in creamy white chocolate and sprinkled with festive decorations. These sweet little bites are not just a crowd-pleaser; they are a cheat code for turning any gathering into a celebration.
I stumbled upon the magic of Peanut Butter Snowballs when tasked with creating homemade treats for my daughter’s school event. With a jar of creamy peanut butter, a dash of butter, and a generous amount of powdered sugar, I crafted these addictive delights that stole the show. The secret weapon? A decadent white chocolate coating that gives them a professional touch without the need for fancy baking skills.
From impressing teachers to converting clean-eating neighbors, these Peanut Butter Snowballs have a way of winning hearts and taste buds. Whether you savor them yourself or gift them to loved ones, these little treats are a reminder that holiday baking doesn’t have to be complicated to be delicious. So, roll up your sleeves, grab your ingredients, and let’s create a batch of Peanut Butter Snowballs that will make you the star of any festive gathering!
Quick Benefits
- Easy to make with simple ingredients
- Impressive presentation for holiday parties and gifting
- Long shelf life – can be stored in the fridge for up to 1 week or frozen for up to 2 months
- Perfect balance of sweet and salty flavors
Why You’ll Love This Irresistible Peanut Butter Snowball Recipe Recipe
- Irresistible Flavor Combination: The creamy peanut butter filling paired with the sweet white chocolate coating creates a delicious and addictive flavor profile that is reminiscent of a peanut butter cup in bite-sized form.
- Easy to Make: This recipe is beginner-friendly and doesn’t require any baking. It’s a simple process of mixing, shaping, and dipping the peanut butter balls in white chocolate.
- Impressive Presentation: The snowballs look elegant and festive with their white chocolate coating, making them perfect for holiday gatherings and gift-giving.
- Shelf-Stable and Freezer-Friendly: These snowballs can be stored in the refrigerator for up to a week or frozen for up to 2 months, making them a convenient make-ahead treat for busy times.
- Crowd-Pleaser: Even those who typically avoid refined sugars couldn’t resist these snowballs, proving that they have broad appeal and can win over even the most health-conscious eaters.
- Holiday Baking Cheat Code: Perfect for those who want to impress with minimal effort, these snowballs make you look like a pro without needing advanced baking skills.
- Versatile and Customizable: You can personalize these snowballs by adding different types of sprinkles or decorations, making them adaptable to different occasions and preferences.
Ingredients for Irresistible Peanut Butter Snowball Recipe
For the Peanut Butter Balls
- 1 cup creamy peanut butter (not natural style with oils)
- 2 cups powdered sugar
- 6 tbsp unsalted butter, softened
For the Coating
- Sprinkles for decorating (optional)
- 16 oz almond bark or white melting candy coating
How to Make Irresistible Peanut Butter Snowball Recipe
Step 1: Mix the Base
Combine the peanut butter and softened butter in a medium bowl until smooth and creamy.
Step 2: Add the Sugar
Gradually incorporate the powdered sugar into the mixture until well combined. The mixture may appear crumbly initially, but continue mixing until a dough forms.
Step 3: Chill the Mixture
Chill the covered bowl in the refrigerator for one hour to allow it to firm up.
Step 4: Shape the Balls
After chilling, scoop 1-inch portions and roll into balls with your hands. Place on a cookie sheet.
Step 5: Freeze Before Dipping
Chill the cookie sheet in the freezer while melting the chocolate to maintain the cookie shape during dipping.
Step 6: Melt the Chocolate
Place the almond bark or white chocolate in a microwave-safe glass bowl. Microwave in 15-second intervals, stirring or shaking between each, for a total of about 3 times. Adjust timing as needed, but avoid overheating as it can cause the chocolate to become stiff and clumpy.
Step 7: Finish Melting
Continue stirring the chocolate until it is fully melted and smooth.
Step 8: Dip the Balls
Remove the peanut butter balls from the freezer. Use a toothpick to skewer a ball, dip it into the melted chocolate, and tap your wrist to remove excess chocolate.
Step 9: Add Sprinkles and Set
Place each coated ball on a sheet of wax paper and sprinkle with toppings, if desired. Allow the chocolate to harden completely before serving.
Storage Tips
To store the finished peanut butter snowballs, it is best to keep them in an airtight container in the refrigerator. This will help maintain their freshness and prevent them from becoming too soft or losing their shape. They can be stored in the fridge for up to 1 week, making them a convenient make-ahead treat for holiday gatherings or gift-giving.
If you want to extend the shelf life of the peanut butter snowballs, they can also be frozen. Simply place them in a freezer-safe container or bag and store them in the freezer for up to 2 months. When you’re ready to enjoy them, just thaw the snowballs in the refrigerator for a few hours before serving. This makes them a great option for preparing in advance and having a delicious treat on hand whenever you need it.
Ingredient Substitutions
If you want to make a healthier version of these Peanut Butter Snowballs, you can try using natural peanut butter instead of the creamy version. Just be aware that natural peanut butter has a different consistency due to the oils, so you might need to adjust the amount of powdered sugar to get the right texture for rolling the mixture into balls. Additionally, you can use dark chocolate instead of white chocolate for coating the snowballs, but keep in mind that dark chocolate might not set as firmly as white chocolate, so they could be a bit softer.
If you have dietary restrictions or preferences, you can customize this recipe further. For a dairy-free option, you can use plant-based butter or margarine in place of unsalted butter. To make these snowballs vegan, ensure the white melting candy coating you choose is dairy-free and made with plant-based ingredients. You can also explore different types of sprinkles or toppings for decorating, such as chopped nuts, coconut flakes, or crushed candy canes, to add your own unique twist to the recipe.
Serving Suggestions
For a creative serving suggestion, consider presenting these Peanut Butter Snowballs on a tiered dessert stand, alternating between white chocolate coated and plain powdered sugar-dusted ones. This visually appealing display will add a touch of elegance to any holiday dessert table. You can also sprinkle some festive colored sprinkles on the snowballs to add a pop of color and make them even more inviting to guests.
Another fun idea is to create a DIY snowball decorating station at your next holiday gathering. Set out bowls of different toppings such as crushed peanuts, coconut flakes, mini chocolate chips, and crushed pretzels for guests to customize their own peanut butter snowballs. Not only does this interactive setup add an element of fun to the party, but it also allows everyone to tailor their treats to their liking, making for a memorable and personalized dessert experience.
FAQs for Irresistible Peanut Butter Snowball Recipe
Question?
Can I use natural peanut butter for this recipe?
Answer:
No, it’s recommended to use creamy peanut butter that is not the natural style with added oils. Natural peanut butter may result in a different texture and consistency in the snowballs.
Question?
How long can I store these peanut butter snowballs?
Answer:
These snowballs can be kept in an airtight container in the refrigerator for up to 1 week. They can also be frozen for up to 2 months, but make sure to thaw them in the fridge for a few hours before serving.
Question?
Can I use dark chocolate instead of white chocolate for coating?
Answer:
While you can experiment with dark chocolate, the recipe specifically calls for almond bark or white melting candy coating to achieve the classic peanut butter snowball look and taste.
Conclusion
As you wrap up your peanut butter snowball-making adventure, remember that the joy of creating homemade treats is in the process itself. These little bites of bliss are not just delicious but also a symbol of the love and effort you put into making something special for yourself and your loved ones. So, whether you’re crafting them for a festive gathering or a cozy night in, let the magic of these Peanut Butter Snowballs fill your heart and your home with warmth.
In the hustle and bustle of the holiday season, take a moment to savor the simple pleasures that come with indulging in a sweet treat like Peanut Butter Snowballs. Share them with friends and family, gift them to neighbors, or keep a stash for yourself as a well-deserved reward for all your hard work. Remember, a batch of these delightful snowballs is not just a dessert; it’s a token of your creativity and care. So, embrace the joy of making and sharing these Peanut Butter Snowballs, and let them sprinkle a little extra magic into your holiday season.
Irresistible Peanut Butter Snowball Recipe
Indulge in the addictive flavors of peanut butter cups with a festive twist in these Peanut Butter Snowballs – a cheat code for holiday baking success!
Prep Time30 Minutes
Cook Time~ undefined
Total Time30 Minutes
CuisineAmerican
Skill LevelEasy
Servings36 Servings (36 balls)
Ingredients
For the Peanut Butter Balls
- 1 cup creamy peanut butter (not natural style with oils)
- 2 cups powdered sugar
- 6 tbsp unsalted butter, softened
For the Coating
- Sprinkles for decorating (optional)
- 16 oz almond bark or white melting candy coating
Instructions
-
Mix the Base: Combine the peanut butter and softened butter in a medium bowl until smooth and creamy.
-
Add the Sugar: Gradually incorporate the powdered sugar into the mixture until well combined. The mixture may appear crumbly initially, but continue mixing until a dough forms.
-
Chill the Mixture: Chill the covered bowl in the refrigerator for one hour to allow it to firm up.
-
Shape the Balls: After chilling, scoop 1-inch portions and roll into balls with your hands. Place on a cookie sheet.
-
Freeze Before Dipping: Chill the cookie sheet in the freezer while melting the chocolate to maintain the cookie shape during dipping.
-
Melt the Chocolate: Place the almond bark or white chocolate in a microwave-safe glass bowl. Microwave in 15-second intervals, stirring or shaking between each, for a total of about 3 times. Adjust timing as needed, but avoid overheating as it can cause the chocolate to become stiff and clumpy.
-
Finish Melting: Continue stirring the chocolate until it is fully melted and smooth.
-
Dip the Balls: Remove the peanut butter balls from the freezer. Use a toothpick to skewer a ball, dip it into the melted chocolate, and tap your wrist to remove excess chocolate.
-
Add Sprinkles and Set: Place each coated ball on a sheet of wax paper and sprinkle with toppings, if desired. Allow the chocolate to harden completely before serving.